Front Reflector 6. BE ALERT pedestrians have the right of way. . . . Most packages will ship USPS Priority which will arrive in 2-3 days. To test the function of the front hand brake, lift the front of the bike and spin the wheel. . Correct fitting Make sure your helmet covers your forehead. We have a table and bike stands in front of the shop so we can bring products and/or bikes to you outside for purchase. . Rear Derailleur 20. .

Parts that are not tight enough can be lost or operate poorly. . ABOUT THIS MANUAL This manual was written to help you get the most performance, comfort, enjoyment and safety when riding your new bicycle. Failure to inspect the bicycle and to make repairs or adjustments, as necessary, can result in injury to the rider or to others. . Brake Adjustment . . . DERAILLEUR ADJUSTMENT With the chain in the middle cog on the crankset (#2 on the left shifter), lift the rear wheel off the ground and pedal slowly. . Due to Covid-19 we are not allowing any customers into the shop at this time. Do not ride at night. . Re-test to make sure the stem is secure with the same process. E WARNING: Do not attempt chain repairs. . Ensure all wheel spokes are tight and not broken.
Front Brake 9. . . Seat Clamp 23. . Make sure all fasteners are correctly tightened as written in this manual. . If too tight, the bicycle will be difficult to pedal. . 7 Model/Serial Number Identification . . . 1-800-551-0032 NOTE: Illustrations in this Manual are for reference purposes only and may not reflect the exact appearance of the actual product. Rear Cassette 21. Handlebar 4. . . . STOP AND LOOK BOTH WAYS BEFORE PROCEEDING.
Lastly, don't forget to stay in close contact with friends and family, especially those isolated. By reading this manual before you go out on your first ride, youll know how to get the most from your new bicycle. B FRAME SIZING When selecting a new bicycle, the correct choice of frame size is a very important safety consideration. Brake Pads Ensure that the wheel is properly centered within the dropouts and is not out of true (see Figure 63). . . Failure to do so may result in the tire coming off of the rim, the tube popping (see Figure 43), and a loss of control of the bicycle, causing injury or even death. 1. . . . . . C 9. Do not remove this bolt completely, as the stem wedge may fall inside your frame. Rear Brake 27. 11. . Free shipping on orders over $75.00. . On behalf of Peak Cycles and BikeParts.com we hope that everyone is safe and well. . Ensure brake pads are not over worn and are correctly positioned in relation to the rims. . . 13. Avoid riding in wet conditions. The model number and production date are found on a sticker on the frame at the bottom of the seat tube. . . Copyright 1995-2022 eBay Inc. All Rights Reserved. . C 7. Disc Brakes When installed properly, the disc brake rotor should be centered between the brake pads, and securely fastened to the wheel (see Figure 34). . . . . (Disclaimer: Assembly video not available for all products). USE HAND SIGNALS. C BICYCLE ASSEMBLY GETTING STARTED Open the box and check that all parts are present. .
ABOUT YOUR BIKE A MODEL/SERIAL NUMBER IDENTIFICATION Each Dynacraft bicycle has a serial number stamped into the frame. . . . . . . . . Using (C) a 4, 5, or 6 mm Allen wrench adjust the brake pad bolts so the brake pads are in line with the the curve of the wheel, striking the upper edge of the braking surface, but not the tire. USE CAUTION AT ALL INTERSECTIONS AND STOP SIGNS. . We are committed to slowing the spread of Covid-19, and to keep our customers, employees, and communities safe. . Adults who choose to accept the greatly increased risk of riding at dawn, dusk or at night need to take extra care both riding and choosing specialized equipment which helps reduce that risk. On Linear Brake equipped bikes, squeeze the brake arms together by hand, and lift the cable out of the carrier to open up the brakes (see Figure 33). . Dynacraft Customer Service 1-800-551-0032 7AM to 4PM Pacific Standard Time DO NOT return this item to the store. Squeeze the brake arms together against the rim of the wheel. . . We will choose either FedEx or USPS for your shipping option depending on your location and the weight of your package. . (See Figure 51.) If the chain seems to be caught in between gears, you can adjust the cable by loosening or tightening the barrel adjuster on the rear derailleur (see Figure 73). The wheel should not rub on the brake pads. . SEAT WARNING: The seatpost must be inserted far enough so that the minimum insertion marks cannot be seen. . .
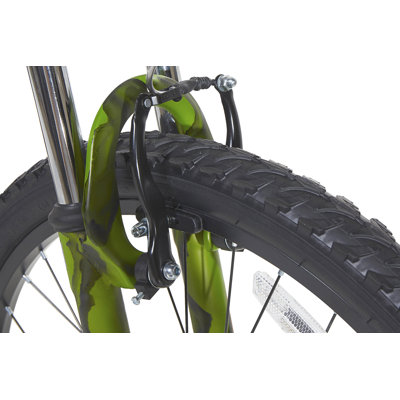
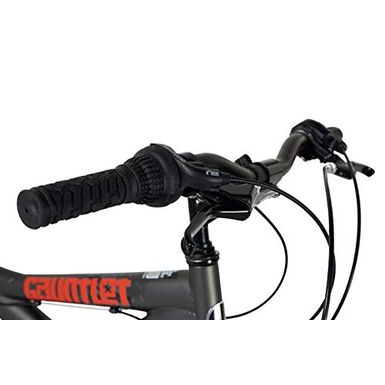
Our service department is also performing pick-up and drop-off of repair bikes outside. . . Heavier items will likely ship FedEx Ground and may be up to a week in some areas. D X BRAKE ADJUSTMENT WARNING: Always make sure your brakes are properly adjusted before riding (see Page 27, Testing Brake Functions). 12. . . This could jam the chain and cause serious damage to the bicycle and/or rider. CHAIN Ensure chain is oiled, clean and runs smoothly. . . B X PARTS/TOOLS LISTS 1. FRONT WHEEL Before installing the front wheel, ensure that the brakes are opened enough to allow the tire to fit through them. RULES OF THE ROAD/SAFETY TIPS B NOTE: Like any sport, bicycling involves risk of injury and damage. . . . C 5. View cart for details. . C 12. B 10. We will remain open under normal business hours until further notice. . Overlooking proper adjustments may cause irreparable damage to the bicycle and/or bodily injury. . Make it tight so the shoulder is in complete contact with the surface of the crank arm. Model # CUSTOMER SERVICE DYNACRAFT CUSTOMER SERVICE 1.800.551. . Head Tube 8. RIDE ON YOUR NEW BICYCLE, AND KEEP THE MANUAL HANDY OF FUTURE REFERENCE. . We are not allowing any bike rentals or demos until further notice. . . . We hope that this horrible situation ends soon and that everyone takes care of themselves both mentally and physically. . To tighten the brake cable, loosen the cable anchor bolt, pull the cable taught, and re-tighten the bolt (see Figure 35). . TESTING HANDLEBAR AND STEM TIGHTNESS To test the tightness of the stem, straddle the front wheel between your legs tightly (see Figures 26 & 27). Pre-Load Bolt The stem should be pointing towards the front of the bike, aligned with the front tire (see Figure 18). HELMETS SAVE LIVES! Firmly squeeze the brake pads against the rim of the tire, pull the cable taut, and re tighten the cable anchor nut using either (C) a 4, 5, or 6 mm Allen Wrench or a pair of (E) Standard Slip Joint Pliers. . . . We are taking every precaution necessary to remain open.

WARNING: Always wear a properly fitted helmet when you ride your bicycle. 7 B BEFORE YOU RIDE . Make sure the stem is inserted enough so that the minimum insertion marks on your stem are completely covered (see Figure 57). . . Slowly close the quick release lever, and you should notice resistance when the lever is half way shut. It is also important that your first ride on your new bicycle is taken in a controlled environment, away from cars, obstacles, and other cyclists. . Kick Stands If the kickstand is not mounted to your bicycle, place the bicycle in an upright position against a wall or have someone hold it upright. . . Call ahead for curbside pickup or come to front door and we will grab your order for you. 1. Signal 100 feet before turning unless your hand is needed to control the bike. . . . . HELMET USE & GENERAL MANUAL DISCLAIMER NOTE: The illustrations in this manual are used simply to provide examples; the components of your bicycle might differ. .

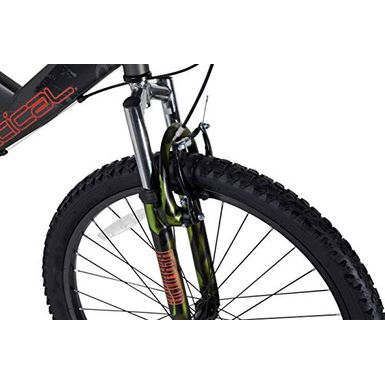
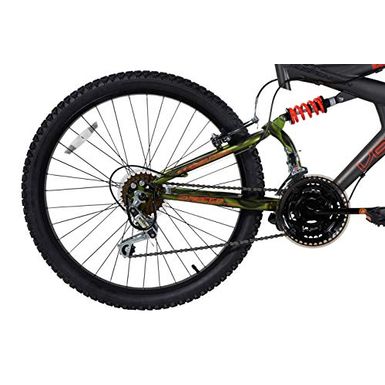
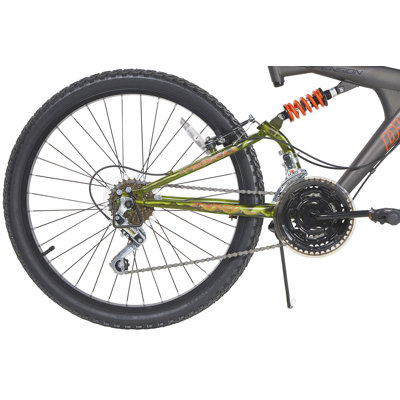
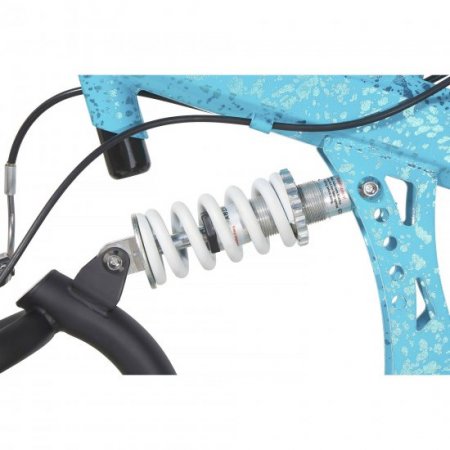
Incorrect fitting Forehead is exposed and vulnerable to serious injury. . B X 5. Car Rack Parts - Bars, Locks, Pads, Etc. . . Before installing the stem, ensure that you have all the parts present and installed in the correct order (see Figure 17). Specifications are subject to change without notice. The rear suspension unit is a combination of a piston that works in conjunction with a spring to allow the rear swing arm to rotate on a pivot point. THIS MANUAL CONTAINS IMPORTANT SAFETY, PERFORMANCE AND MAINTENANCE INFORMATION. Locking Washer (x2) 14. Use (C) a 4, 5, or 6 mm Allen wrench to remove the preload bolt, cap and cardboard spacer from the headset. If your stem has multiple bolts, be sure to tighten them evenly (alternating each bolt a few turns at a time).
. If the handlebar does move, re-align the stem with the front wheel and tighten the stem bolt. TIRE INFLATION WARNING: Tires must be properly inflated before riding. . Once complete, tighten the bolt(s). . * Oversize items or orders weighing over 50 lbs are not included in this promotion. . . Firmly continue to push the lever until it is in the closed position, and the word close is showing. . Bicicleta Aftershock para hombre, 2 product ratings - Boy's 20" Krusher Fat Tire Bike w/ Cool Graphics, Single Speed, Red, 2 product ratings - Dynacraft 24 INCH B 18S Gauntlet RED Bike Bicycle. . For local online customers, you can pick up your will-call orders at Peak Cycles. . . . Simply ensure that the brake and derailleur cables track smoothly, and that the handlebar bolt(s) are properly tightened with (C) a 4, 5, or 6 mm Allen Wrench. .

Frame 2. Place the kickstand in the bracket mounted on the frame and use a pair of (E) Standard Slip Joint Pliers to secure the fixing bolt to keep the kickstand in place. Ensure tires have tread and have no bulges or excessive wear. Rear Reflector 24. **
. Depending on the type of bolt, tighten the stem bolt with either (B) an adjustable wrench or (C) a 4, 5, or 6 mm Allen wrench (see Figure 19). . For detailed instructions on brake adjustments, please see pages 3537. Your bike may have one (see Figure 59), two (see Figure 60), or four (see Figure 61) bolts holding the handlebar in place.

Failure to securely tighten the nut could result in brake failure and personal injury (see Figure 31).

(See Figures 23-25). . WHEELS AND TIRES Ensure tires are inflated to within the recommended range as displayed on the tire sidewall. Ensure that the handlebar reflector is pointing straight forward and perpendicular to ground, and position the rear reflector so that it points straight backwards. . . If you can get out and walk, hike or ride, then take advantage of it. The amount of Rear Suspension travel can be adjusted by turning the adjusting plate. . . . Make sure all parts are correctly assembled and adjusted as written in this manual. . Specifications are subject to change without notice. . *International orders do not qualify for free shipping. . HANDLEBAR ADJUSTMENT D X To adjust the handlebars forward and backwards, loosen the stem bolt or bolts. 1 product ratings - Dynacraft 26 pulgadas. YOU. . Handlebar Adjustment . C 8. . . . . . RIDE ON YOUR NEW BICYCLE, AND KEEP THE MANUAL HANDY OF FUTURE REFERENCE. When the chain is at the correct tightness, you can rotate the crank freely and you can pull it no more than one-half inch away from a straightedge as shown (see Figure 74). Locknut (x4) 16. . C 4. Please have the following information available when you call: Model Number: (sample: 8802-33) Production Date: (sample: 03.03.2015) Serial Number: (sample: DA0233HD00001) Having this information will be required and helps us handle your call more effectively. Edirt bike 24v/36v electric vehicles (29 pages), Manual will be automatically added to "My Manuals", Testing Seat Clamp and Post Clamp Tightness, Bicycle Dynacraft 700C DYNACRAFT CITY SCAPE PEDAL ASSIST BIKE 8802-46 Owner's Manual, Bicycle Dynacraft SINGLE SPEED Owner's Manual, Bicycle Dynacraft BALANCE CYCLE Owner's Manual, Bicycle Dynacraft TALKING THOMAS TRIKE Manual, Page 19: Testing Seat Clamp And Post Clamp Tightness, Page 23: Testing Handlebar And Stem Tightness. Loosen enough to make the adjustments, and re-tighten the nuts. DUAL SUSPENSION Dual suspension bikes are equipped with a front fork as well as a rear suspension generally located below the seat (see Figure 38). . . . You can check against the list on page 9. . . . Front Derailleur 18. Contact: 888.606.1616 10-6 M-F, 10-5 Sat MST. In the case of a 2 or 4-bolt stem, tighten the bolts alternating between bolts every few turns. . Brake Lever (L and R) 3.

.
. . . F LIMITED WARRANTY Although your new Dynacraft bicycle is built tough, it is designed for recreational use only, not commercial use or extreme riding. Brake arm Brake pad 7A. . . . . In addition, some of the parts shown might be optional and not part your bicycles standard equipment. There seems to be a problem serving the request at this time, {"modules":["unloadOptimization","bandwidthDetection"],"unloadOptimization":{"browsers":{"Firefox":true,"Chrome":true}},"bandwidthDetection":{"url":"https://ir.ebaystatic.com/cr/v/c1/thirtysevens.jpg","maxViews":4,"imgSize":37,"expiry":300000,"timeout":250}}, Dynacraft 821049TJ Mountain Bike Trails 21 Speed Full Suspension 26" One Size, Dynacraft Aftershock 26" Men's Mountain Bike - Blue (8211-89), Dynacraft 26" Women's Aftershock Dual Suspension Montain Bike - Blue (8211-88), Dynacraft 8154-47 24-Inch Wheel 18 Speed Dual Suspension Boy's Bike - Red, Dynacraft 8109-34ZTJ 20" BMX Street/Dirt Bike for Boys - Black/Red/White, Dynacraft Genesis 20 Inch Boys Krome 2.0 BMX Bike with Front and Rear Pegs, Blue, Dynacraft 805659 16 inch Cycling Bike - Blue. On side-pull equipped bikes, you may have to loosen the cable anchor bolt (see Figure 31) in order to allow the tire to fit through. To determine the correct size bicycle for the rider: Straddle the assembled bicycle with feet shoulder width apart and flat on the ground There must be at least one inch (2.5cm) of clearance between the highest part of the top tube of the bicycle and the crotch of the rider with the tires properly inflated. . Derailleur Guard 28.
If any parts are missing or damaged, or if you have any trouble with the assembly, dont return the item to the store. . . TESTING BRAKE FUNCTIONS As part of the initial assembly, you will need to check test the brake function and adjust the brakes as necessary to make sure they are functioning properly.

Top Cap Stem Figure 18 If your bicycle comes with a threadless stem (see Figure 20), we must first remove the headset in order to install. . . . HANDLEBAR/STEM Minimum insertion mark WARNING: To prevent steering system damage and possible loss of control, the stem must be inserted enough so that the minimum insertion marks are completely covered (see Figure 14). .

. . READ THE MANUAL BEFORE TAKING YOUR FIRST. It certainly helps with stress and anxiety during difficult times. . WARNING: Figure 42 Incorrectly seated Properly seated Be sure to check that the edge (beads) of both tires are evenly seated the entire way around on both sides of the tire. The chain must be at the correct tightness. C 11. NIGHT RIDING B Riding a bicycle at night is much more dangerous than riding during the day. .
B X SAFETY CHECKLIST Before every ride, it is important to carry out the following safety checks: (For information and instructions on performing specific equipment checks, locate the relevant section in the manual referenced on pages 56.) It should shift smoothly, and stay in gear without jumping between gears or excessive noise. . . Subject to the following limitations, all bicycles manufactured for Dynacraft are warranted to the original purchaser to be free of defects in materials and workmanship for a period from the date of purchase until: Lifetime for the Bicycle Frame and Fork, and Two Years On All Other Bicycle Component Parts. . .

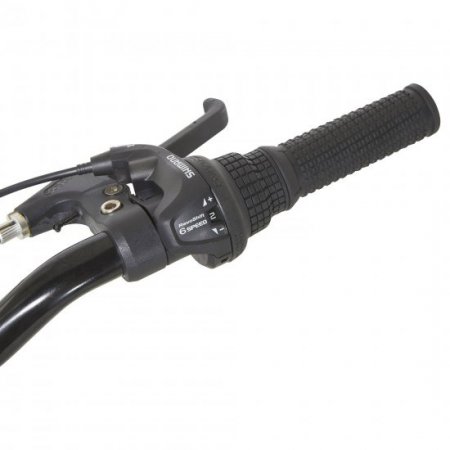
. NOTE: Illustrations in this Manual are for reference purposes only and may not reect the exact appearance of the actual product. . . . 6. . . BRAKES Cable Anchor Bolt WARNING: When assembling or adjusting the brakes, make sure the cable anchor nut is tight. . We will adjust the position and rotation of the handlebars, brake levers, and shifters later on (see page 35). ACCESSORIES Your bike may come with some or all of these accessories that require attachment and/or assembly. D X SHIFTER ADJUSTMENT WARNING: Do not ride a bicycle that is not shifting properly. Thank you for reading and we wish you well. . .

The serial number can be found on the bottom of the crank housing as shown (see diagram below). Wheel Reflector (x2) 15. With the front wheel off the ground, you should not be able to move the fork up, down, or side-to-side in the head tube. . .

Something went wrong. For online customers, BikeParts.com is running at normal capacity as are our shipping companies USPS and Fedex. 7 Spaces to Write Info . Try to turn the handlebar back and forth. CAUTION: Figure 6 Seatpost Seat tube Operate the quick release lever by hand only. . . Tighten the brake pad bolts once they are positioned correctly. . . . BRAKES Ensure front and rear brakes work properly. . .

. . Crankset 19. Be careful not to loosen them all the way so that the nut comes off on either side. . .


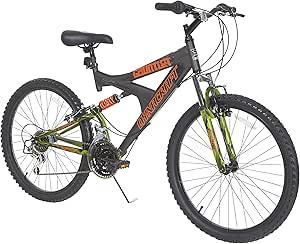
MOUNTAIN BIKE OWNERS MANUAL THIS MANUAL CONTAINS IMPORTANT SAFETY, PERFORMANCE AND MAINTENANCE INFORMATION. Grip (L and R) 5. C If your bike has a quick release lever (see Figure 9), tighten it by holding the lever in the open position and tightening the nut on the opposite side by hand. . Ensure brake control cables are properly lubricated, correctly adjusted, and display no obvious wear. . . Ensure that the mounting bolts on Disc Brake are evenly tightened (see Figure 35). . Be sure to tighten the fixing bolt securely.

. . . . . . . BE ALERT when riding near parked cars - ride far enough away from the cars so that you wont get hit if someone opens the car door. .
Add some white grease to the inside of the seat tube, and slide the seatpost into the bicycle. C The handlebars should come attached to the stem. . REFLECTORS Reflectors are pre-installed on your bicycle on the pedals, wheels, seatpost, and handlebars (see Figure 46). E LUBRICATION Frequency Weekly Every Six Months Yearly Component Lubricant How to Lubricate Chain Chain lube or light oil Brush on or squirt Derailleur Wheels Chain lube or light oil Oil can Derailleurs Oil 3 drops from oil can Brake Calipers Oil 2 drops from oil can Freewheel Oil 2 squirts from oil can Brake Cables Lithium based grease Disassemble Bottom Bracket Lithium based grease Disassemble Headset Lithium based grease Disassemble Hubs (front and rear) Lithium based greas. . . . 33 Seat Adjustment .
. Cable Carrier Linear Pull Brakes Brake Cable D X Cable Anchor Nut Once the brake pads are properly positioned, loosen the cable anchor nut on the Brake Arm (See Figure 65). READ THE MANUAL BEFORE TAKING YOUR FIRST RIDE ON YOUR NEW BICYCLE, AND KEEP THE MANUAL HANDY OF FUTURE REFERENCE. Have a bicycle shop clean and re-grease the bearings once a year or any time they do not pass the following tests: Header Bearings The fork should turn freely and smoothly at all times. . . . . E MAINTENANCE AND INSPECTION WARNING: Inspect the bicycle frequently. ALWAYS BE ALERT. . . *Oversize items may include but are not limited to: framesets, wheelsets, car racks, bikes and storage racks. . Use (A) Phillips head screwdriver to loosen and adjust before retightening (see Figures 47 & 48). . Brake Pad (x4) 10. Call Dynacraft directly at 1-800-551-0032 or visit our website at www.dynacraftbike.com, find your bike, and locate the assembly video in the Information Center. . . . . 1. . So you need to know and to practice the rules of safe and responsible riding. It is important for you to understand your new bike. If too loose, the chain can come off the sprockets. . Never move the shifter while pedaling backward, nor pedal backwards after having moved the shifter. Next, squeeze the brake lever and take note of the brake pads contacting the side of the wheel. . Specications are subject to change without notice. . .
Tube (x2) 13. Therefore, children should never ride at dawn, dusk or at night. . The seat should not be able to move back and forth, up and down, or side to side with the quick release lever in the closed position. NOTE: If you dont have a bicycle repair stand, it helps to have Figure 70 someone assist you with the adjustment. Use (C) a 4, 5, or 6 mm Allen Wrench to check the rotor mounting bolts to ensure that none of the bolts are loose. Stem 7. Make sure that the minimum insertion mark is completely covered and that the seat is pointing forward in alignment with the bicycle (see Figures 6 and 7). We have experienced very few delays for most of our US customers over the 2 weeks. Unless the shoulder of the pedal spindle is tight to the face of the crank arm, the pedal may back out causing serious injury or death. Immediately replace any damaged, missing, or badly worn parts. If you have any questions, please email us at contact@bikeparts.com 24/7 or call 888-606-1616 Mon-Fri 10AM-6PM MST, Sat 10AM-5 PM MST, closed Sun. STOP Please call Dynacraft for assistance.

. C 6. D X STEM ADJUSTMENT To raise or lower your stem, use an adjustable wrench or Allen wrench on the stem bolt to loosen the stem (see Figure 56). C 10. Ensure rims run true and have no obvious wobbles or kinks. . Dynacraft BSC, Inc. 89 S. Kelly Rd. . The handlebar should not slip or move independently of the front wheel at all. . In our Peak Cycles bike shop in Golden, Colorado we will continue to perform bike repairs and sales. . The following manual is only a guide to assist you and is not a complete or comprehensive manual of all aspects of maintaining and repairing your bicycle. . . . . . . C 2. C 7C. . . . . Extra care is required in wet or dusty conditions. No other express or implied warranty given. . . A bicyclist is very difficult for motorists and pedestrians to see.

CONTENTS A ABOUT YOUR BIKE . While continuing to pedal, shift the right (rear) shifter through the rings. NOTE: Illustrations in this Manual are for reference purposes only and may not reflect the exact appearance of the actual product. . . . Never exceed the maximum pressure (PSI) that is listed on the side of the tire. . Headset 17. . Add some white grease to the inside of the fork steerer tube. Do not completely remove these bolts, simply loosen them until you are able to move the handlebar to the desired position.

Questions or comments? E BEARING INSPECTION Maintenance Frequently check the bearings of the bicycle. Pedal (L and R) 22. D BICYCLE ADJUSTMENTS. . Stem Adjustment . . . . . Seat Post 26. . If there is a problem with the chain, have a bicycle service shop make any repairs. . 7 Customer Service . Tire (x2) 12.

PEDALS C WARNING: Attachment of an incorrect pedal into a crank arm will cause irreparable damage. . . Shifter Adjustment . . Do not over inflate. . .
.
Consult your dealer about night riding safety equipment. Saddle 25. . By choosing to ride a bicycle, you assume the responsibility for that risk; not the people who sold you the bike; nor the people who made it; nor the people who distribute it; nor the people who manage or maintain the roads and trails you ride on. Check that axle nuts are tight.

BICYCLE ADJUSTMENTS D X SEAT ADJUSTMENT You can adjust the up and down tilt of your seat as well as the forward and back position by loosening the seatpost hardware at the bottom of your seat. Before your first ride, please check to ensure your pedals are attached correctly. Communicate by using hand signals to tell other drivers what you are going to do.
When contacting Dynacraft, please have these two numbers ready. . DO NOT return this item to the store. . . Side Pull Brakes After installing the front wheel, loosen the cable anchor nut and pull the brake cable through it. Fork 11. . 12A. Ensure all attaching hardware is secured and there is no lateral movement of the rear triangle (see Figure 39).