Source.

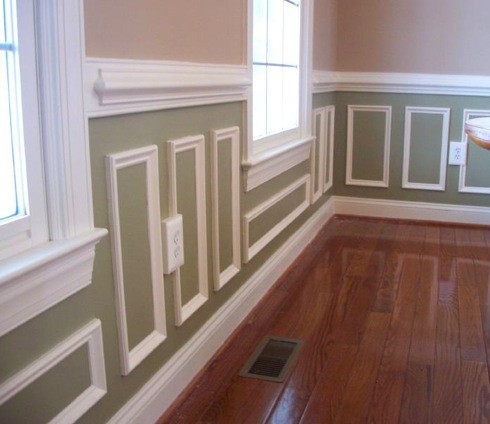
I want to place 2 frames here. Touch device users, explore by touch or with swipe gestures. I love picture frame wainscoting because its classic and feels like it fits the style of the house. Then, I can start tackling the wallpaper! The picture frame moulding I chose came in 8-foot sections so I had to combine different lengths that would be needed to make the most use of each piece of trim molding. First, I checked that they fit together well. Dont go crazy nailing because it will be more to caulk later! Can you see the worn out/dirty paint on the baseboards? You can totally do all the cuts for this with a basic miter box. Plus the walls are white and its hard to see all the details. Thank you so much. Any problems down the road. (Color: Benjamin Moore Cloud White.) But a weekend warrior must soldier on to keep on top of home projects. It wasnt actually picture frame moulding. Just measure it out a few times. I think you have the best wainscoting tutorial. I wanted all of the walls to look symmetrical, but it just didnt look right to me because the picture frame boxes would have been too narrow. Thank-You For Explaining This Project in Detail,& Taking The Time To Share!! Debbie, Thank you Debbie! If you liked this project make sure to pin it for later and check out my other recent posts! This is my husband Cole double checking the each piece was 96 inches long. I just want to apologize for the horrible quality photo ahead of time. document.getElementById("ak_js_1").setAttribute("value",(new Date()).getTime()); My name is Timisha. We actually got the wainscoting at the same time we bought the rest of the molding for the dining room. And its really easy to do you dont need any special skills or equipment. What are the dimensions (how wide) is the trim in between the frames and chair rail? If you are a DIYer save the headache and buy the level trust me! We were getting a new bed and mattress so I said why not do it before we put the new bed together! I really wanted a special wall treatment behind the out new bed. Prior to marking out the wall I first marked the spot for this piece of moulding using a 13 scrap piece of wood. Your wainscoting job came out great, thanks for sharing the knowledge and results. Real People. Each piece was $4.96 and we bought 14 pieces total with a few leftovers that we wanted in case we messed up. There is a crap ton of caulkign to do in this project! All in all in turned out great. Traditionally, wainscoting consists of a square (box) or four-sided frames to build a wall treatment. We brought all the pieces inside and used a laser level, another new toy he had to have. I dont want it to in turn make my molding look really small. If I send you measurements of my walls will you help me with the math? Just wipe it flush when you apply it! I have wanted to add board and batten or picture frame wainscoting to a wall in my house for a long time now. This is not where we placed the first piece I just snapped the pic a bit early. Thank you so much Christine. Does it stand up over time? Alright, if you got through all of that and it actually made sense, I am shocked, because I kind of got lost myself there for a second. Plugging that in. I know you can do it. Finally, it was time to start nailing the picture frame moulding to the wall. Hi I love this tutorial and I feel empowered to take on this project! This is where the level came in handy. The spacing between wall frames should be from 2 to 3 inches but the space above and below can be as much as 4 inches. This kept the wire brads from protruding through the backside of the molding and freed up a hand to hold the trim while I hammered it in. Lets take your bedroom from drab to fab with some color and warmth! Was the picture frame part 1in wide?

There are different types of wood filler, so make sure you choose the right one. After the glue dried a bit (not all the way), I nailed the frames to the wall, and then sunk the nails. Please let me know. We have gathered our favorite pieces from around the web to give you some inspiration for your own space.

I noticed thinner ones dont look that good. How stunning is this, doesnt it make the room look so elegant? It was not hard at all and besides the tedious caulking, it went by really fast. This will give you a consistent length throughout. We bought 11/16 X 1-1/8 X 96 WHT CAP MLDG for the frame pieces. So glad you found it helpful and easy to follow. In my case, I used 3 inches for the spacer. Thank you so much! Using the lasers it was super easy to make sure all the pieces were level and at the right height. Another favorite view to end the day. We decided to go with this thin picture frame wainscoting because it was pretty cheap and seemed like it wouldnt be very hard. The height was 19 1/12. We spent about $70 in total. Plus, I wanted more closed storage. The tricky part was above the door. I am doing the dining room and the hallways. Above, you can see where I marked the height of the chair rail (the top of the chair rail will go along those lines). It looks so good! Trim Moulding, picked to taste. It is definitely easier with two people hanging the trim though. In the pic above he is double-checking the measurements and spacing. Fill in your details below or click an icon to log in: You are commenting using your WordPress.com account. I used the same 3 inch distance on top, bottom, and in between each picture frame box. Our dining room in our new house started off looking like this: You can see all of the before photos here and my initial inspiration for the room. Check out these free printable artwork downloads! ), I felt like I had struck gold! 2022 ToolBox Divas Sage Theme by Restored 316, 7 Things To Know When DIY-ing Roof Shingle Installation, How to Repair Drywall After Removing Tile: Prepare for Tiling, Turn That Old Wooden Ladder Into An Herb Garden, Refinishing Furniture: Selecting the Right Wood Filler. A few times I had to sand down the point of the angle (probably the fault of the rough hand saw).
Our bedroom is really small. document.getElementById( "ak_js_1" ).setAttribute( "value", ( new Date() ).getTime() ); Enter your email address to subscribe to this blog and receive notifications of new posts by email. It was the smallest frame like moulding they had that looked similar to a picture frame. Hi Chris, I have wanted to do something like this in our hallway and this looks like the perfect project. Very clear explanations. Thats (-7). You did a fantastic job. It works. I say to her why dont you let me make an herb garden, Read More Turn That Old Wooden Ladder Into An Herb GardenContinue, *Sponsored by DAP Products Inc.

I will try to find out and get back to you! Now, the only thing left to do is prime and paint your wainscoting. It could use a little dusting lol but overall it still looks great. 4 inches isnt a huge difference but there should be a way to match up the panels but resizing so that the frames are the same. I Love This Idea,& The Money Saved By DIY!! Youve got that in parentheses, so I think I do that first 1-3= (-2). And im so glad you found the tutorial helpful/inspirational. Getting the landscaping here under control is a long process but I love the neatness when its done! So I foundthis article and this article, which are great summaries of the history of chair rails and wainscoting and the correct way to install it to make your room look its best. Doesnt have to be perfect under there! When I measured the walls, I figured out how many inches would look good as a spacer between the edge of the wall and where the first piece ofmolding would be installed. Thank you so much!! Yes, its held up. Timisha, what a great project and tutorial! The frames can change size, but the measurement above, below, and between them must remain consistent. I suggest nailing the top piece first, then both sides. If you own any wood furniture, chances are, youve gotten a scratch or ding or even a gash in it at some point or another. It looks dangerous. She replied, I dont know. I hope they inspire you to create a space you love spending time in. This is the spacing of the frames and upper trim moulding. Photo by Infiniti Master Builder Inc. Look for transitional dining room design inspiration, Hyde Caulk-Away and Caulk Rite Combo Pack, Ultra Pure White Semi-Gloss Zero VOC Interior Paint, https://homedepot.sjv.io/c/1246871/456723/8154?u=https%3A%2F%2Fwww.homedepot.com%2Fp%2FRyobi-18-Volt-ONE-Cordless-AirStrike-18-Gauge-Brad-Nailer-Tool-Only-with-500-nails-P320%2F203810823, Tiered Garden Bed from Reclaimed Materials, How to Maximize Garage Storage with Husky Storage Solutions, The Ultimate Tiny Bathroom Update in time for the Holidays. Something around 1 but what exactly? Within the two outer spacing A is the width I have to work with in determining the width of the frames. Those lines represent the outside of the rectangle. Its so hard to focus on DIYprojects this time of year. Could you share the type/ size with us for all the molding/ chair rail etc? Using wainscoting panels is a good way to do it too. Im wondering: How long has it been up? Then, I hammered the nails part of the way into the molding before I started putting it on the wall. So each frame for this wall will be 28.25in Wx 25 H. And remember the height is fixed. My smallest wall can fit at 20in box with 3.5 in on each side. For the rectangle to the left of that, I measured 3 inches from the window rectangle and 3 inches from the wall to the left, 3 inches down from the chair rail and 3 inches up from the baseboard and I had another frame. For my wainscoting style I am adding an additional decorative trim above my picture frame moulding. (We did not level these chair rails in an old house, it is sometimes better to have a piece of architecture level with the ceiling or floor than truly level, as they will appear more level to the naked eye if they are parallel to other elements in the room. Obviously, the first thing I did was steam off that border. Read More 7 Things To Know When DIY-ing Roof Shingle InstallationContinue, Learn how to make a bar table that can go on any balcony or deck rail. . I loved our old one, but since it sat directly on the ground and was all glass, it was really dangerous for the kids. Once youve completed all of your picture frame moulding boxes, its time to fill the nail holes with wood filler. I do have a quick question. Then, I got my level and placed it on top of the molding. Source. Also, how wide is the picture frame moulding you used? Traditionally, wainscoting referred to an element of home design in which solid wooden panels were installed across the lower half of a rooms walls to help keep the room warmer (were talking pre-insulation days), but over the years the term has grown to include multiple forms of decorative wall paneling. So, for our room with 9 foot ceilings (108 inches), the top of the chair rail would be installed at 27 inches.