Every Pi model since the Raspberry Pi B+ has had 40 GPIO pins, though on the Pi Zero and Zero W, you have 40 holes that you can solder pins or wires into. At the end Ill give you more details about the differences between Arduino and Raspberry Pi pins. You can either buy one or build one yourself. First of all, Raspberry Pi has a microprocessor, often running a Linux system (for example Raspbian), while Arduino has a microcontroller. The store will not work correctly in the case when cookies are disabled. PiicoDev OLED Display Module (128x64) SSD1306, SparkFun Micro 6DoF IMU - ISM330DHCX (Qwiic), SparkFun Micro Magnetometer - MMC5983MA (Qwiic), Micro USB OTG Host Cable (for Raspberry Pi Zero). For that youll need an external power source. We use cookies on our website to give you the most relevant experience by remembering your preferences and repeat visits. With those protocols youll be able to transfer far more information than with just a bunch of GPIOs configured as digital pins. SCLK: clock of the SPI. You can then use more GPIOs to transfer more pieces of information. When connecting an LED to the GPIO, we first need to make sure that the LED is wired up correctly and that it lights up. So it is best practice to start using and learning the BCM pin numbering scheme as it will become second nature to you over time. If you want to use an analog sensor, youll have to use an external ADC (Analog to Digital Converter), and maybe get the value using I2C or SPI protocol. It featur Read (and write) RFID/NFC tags with this compact module. By connecting the long leg of the LED, the anode to the 3.3v pin via a resistor, and the shorter leg, the cathode to any of the Ground (gnd) pins we can check that our LED lights up and is working. GPIOs allow you to easily use hardware features and communication, directly from a computer the Raspberry Pi microprocessor. The cookie is used to store the user consent for the cookies in the category "Analytics". I2C is a low speed two wire serial protocol to connect devices using the I2C standard. Delivered by Thu, 04th of Aug. 31 from local stock, 1 supplier stock; your order will dispatch between Dec 1 to Dec 10. SPI is another protocol for connecting compatible devices to your Raspberry Pi. Note: The Raspberry Pi Model A+, Raspberry Pi 2, Pi3, Pi 4 and Zero arealso compatible with this product! For example, WiringPi uses the void digitalWrite(int pin, int value); to set the state of a GPIO, which is the exact same function in Arduino to set the state of a digital pin. You will see the majority of Raspberry Pi tutorials using this reference and that is because it is the officially supported pin numbering scheme from the Raspberry Pi Foundation.
54inch module display ink pi ch epaper The power pins are used as a source to power external components, not to power the Raspberry Pi itself from an external source. Be among the first to hear about new product launches, discount codes and more! The BCM pin mapping refers to the GPIO pins that have been directly connected to the System on a Chip (SoC) of the Raspberry Pi. RX for Reception. GPIO means General Purpose Input/Output.
svg gpio header pi file elinux pixels resolution The cookie is set by GDPR cookie consent to record the user consent for the cookies in the category "Functional". This cookie is set by GDPR Cookie Consent plugin. Along the way Ill make some comparisons with the pins of the Arduino boards. Insert the header into the top side of your Raspberry Pi board and solder the opposite side to the Pi. The cookie is used to store the user consent for the cookies in the category "Performance". Some batteries (such as LiPo) can't be shipped by Air. If the component youre communicating with is not already powered, youll also have to use a power pin (3.3V or 5V) to power on that component. This cookie is set by GDPR Cookie Consent plugin. In essence we have direct links to the brain of our Pi to connect sensors and components for use in our projects. This header has 3mm of pins, compared with our stacking version which is the same base height but has 10mm header pins instead. It brings the Raspberry Pi 4 much closer to hardware applications, making it perfect for being embedded in a hardware application or product: a robot, a retro-gaming application, etc. Those pins can be used to power components such as sensors or small actuators. The most common use of I2C is to read data from sensors and actuate some components. When building circuits it is always wise to make your ground connections first before applying any power as it will prevent any issues with sensitive components. Functional cookies help to perform certain functionalities like sharing the content of the website on social media platforms, collect feedbacks, and other third-party features. It requires more wires than I2C, but can be configured to run faster. Well, the answer is quite simple. This header has 2 rows of 20 pins that are spaced just right for the Raspberry Pi GPIO pins spaces and with a little bit of soldering, you can install it on your Pi. You can find them with the 3 letters GND. Note: click continue and a draft email will be opened to edit. The famous UNO Rev 3 - a fantastic first Arduino board for beginners, A small, complete, and breadboard-friendly Arduino board. Out of these, the cookies that are categorized as necessary are stored on your browser as they are essential for the working of basic functionalities of the website. International Orders - the following rates are for New Zealand and will vary for other countries: If you order lots of gear, the postage amount will increase based on the weight of your order. GND: I guess you start to get used to that! This GPIO header is also the same for Raspberry Pi 3 boards, so this guide applies to both versions. For example, pin 29 corresponds to GPIO 5. The ground is very useful for making a common reference between all components in your circuit. Tom's Hardware is part of Future US Inc, an international media group and leading digital publisher. The Raspberry Pi has eight ground connections along the GPIO and each of these ground pins connects to one single ground connection. This protocol is quite easy to use and very convenient for communicating between several boards: Raspberry Pi to Raspberry Pi, or Raspberry Pi to Arduino, etc. If youre interested though, check out page 102 of the bmc2835 datasheet (this is the datasheet for the whole GPIO header), where youll see a complete table with all alternate functions for all GPIOs. Advertisement cookies are used to provide visitors with relevant ads and marketing campaigns. For the best experience on our site, be sure to turn on Javascript in your browser. And yes, stock levels and lead times are accurate! Connect all SCLK pins together. So, before you choose between those 2 kinds of boards for your project, make sure you know what you need: more computation power, the need to use high level languages (Raspberry Pi), or something more close to hardware, with limited resources (Arduino)?
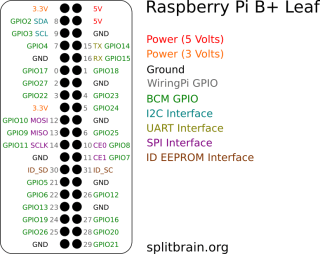
It does not store any personal data. Find yourself a personal project, and youll learn more stuff along the way. And for the column starting with pin 2 it will go 4,6,8 etc until it reaches 40. The GPIO is the most basic, yet accessible aspect of the Raspberry Pi. MOSI: means Master Out Slave In. Connect your own PCB to a Raspberry Pi with this normal-height female header. Ill repeat it here: you can never be too cautious when manipulating the pins! Make sure you know which voltage is accepted by the component before you plug anything. This site is protected by reCAPTCHA and the Google, Stacking Header Set for Raspberry Pi Pico, Tall Push-Fit Stacking GPIO Header for Raspberry Pi - No Shroud, 4 + 40 Pin Push-Fit Extra Tall Header Set for PoE HATs, GPIO Stacking Header for Pi A+/B+/Pi 2/Pi 3 (Extra-long 2x20 Pins), Coloured Male Header Set for Raspberry Pi Pico, Extra-Tall Push-Fit Stacking GPIO Header for Raspberry Pi - Double Shroud, Extra-Tall Push-Fit Stacking GPIO Header for Raspberry Pi - Single Shroud, GPIO Header for Raspberry Pi A+/B+/Pi 2/Pi 3/Pi 4/Zero (2x20 Female Header), Coloured Female Header Set for Raspberry Pi Pico, GPIO Header for Raspberry Pi HAT - 2x20 Short Female Header, 0.1" 2x20-pin Strip Right Angle Female Header, Angled Male GPIO Pin Header for Raspberry Pi Zero, Angled Shrouded Box GPIO Header for Raspberry Pi, GPIO Header for RaspberryPi A+/B+/Pi 2/Pi 3 (Tall 2x20 Female Header), SMT GPIO Header for Raspberry Pi HAT - 2x20 Short Female Header, Shrouded Box GPIO Header for Raspberry Pi, 4-Pin Push-Fit Extra Tall Header for PoE HATs, 26 Pin GPIO Shrouded Box Header - 90 Degree Angle, 2x20 Socket Riser Header for Raspberry Pi HATs and Bonnets. Now, if you feel lost with so much information and dont know where to start, heres a list of steps you can take from there: And then, there is no secret! The cookies is used to store the user consent for the cookies in the category "Necessary". But, if there's no network connection, you can also control a headless Pi using a serial cable or USB to serial board from a computer running a terminal console. With 3mm you don't have to cut the really long pins, so its ideal for basic Pi HAT designYou'll get one header per order. By using a UART to USB converter, you can communicate between your laptop and Raspberry Pi with UART. If you just begin with Raspberry Pi 4 pins, just dont connect anything to those pins. Adafruit NeoPixel Digital RGB LED strips come to us in 4 or 5 meter reels with a 2 or 3-pin JST SM connector on each end and separated power/ground wires as shown in the picture below. The NEW micro:bit V2 - now with a speaker, microphone and touch sensor! If you configure a GPIO as input, youll be able to read a value from it: HIGH or LOW (1 or 0). If you connect 2 circuits together, add a wire between both grounds to make it common. The most common library is RPi.GPIO (https://pypi.org/project/RPi.GPIO/) and it has been used to create thousands of projects since the early days of the Raspberry Pi. KEYESTUDIO 37 in 1 Sensor Kit 37 Sensors Modules Starter Kit for Arduino Mega R3 2560 Raspberry Pi Programming, Electronics Components STEM Education Set for Kids Teens Adults + Tutorial, Frienda Break-Away 0.1 Inch 2 x 20-pin Strip Dual Male Header Double Row Straight Connector Pin Header Compatible with Raspberry Pi Zero GPIO (Pack of 20), Break-Away 0.1" 2x20-pin Strip Dual Male Header for Raspberry Pi Zero GPIO(Pack of 10), GeeekPi 2x20 40 Pin Stacking Female Header Kit for Raspberry Pi 4B/3B+/3B/2B/B+/A+/Zero/Zero W(2)/Jetson Nano/Tinker Board(7 Specifications)(13Pcs in Total), Adafruit Break-away 0.1" 2x20-pin Strip Dual Male Header [ADA2822], Raspberry Pi Pico with Pre-Soldered Header Microcontroller Mini Development Board Based on Raspberry Pi RP2040 Chip,Dual-Core ARM Cortex M0+ Processor, Flexible Clock Running up to 133 MHz, 2 x 20 (40 Pin) Extra Tall Female 0.1 Inch Pitch Stacking Header Compatible with Raspberry Pi A+/B+/Pi 2/Pi 3 Extra Tall Header (Pack of 8), Ultra-Small RPi GPIO Terminal Block Breakout Board Module, for Raspberry Pi, HCDC RPi GPIO Status LED & Terminal Block Breakout Board HAT for Raspberry Pi A+ 3A+ B+ 2B 3B 3B+ 4B, Raspberry Pi Zero WH with 40PIN Pre-Soldered GPIO Headers, Geekworm 2x20 40 Pin Stacking Female Header Kit for Raspberry Pi 4B/3B+/3B/2B/B+/A+/Zero W/Zero 2 W(5 Specifications 10Pcs), Raspberry Pi GPIO Stacking Header/Extender, Raspberry Pi Pico Header Pack, GeeekPi Micro Connectors Raspberry Pi 40-pin GPIO 1 to 2 Expansion Board 2 x 20-pin Strip Dual Male Header Double Row Straight GPIO Connector Pin Header Compatible with Raspberry Pi(2Pack), Adafruit 4079 2 x 20 Socket Riser Header for Raspberry Pi Hats and Bonnets, risingsaplings 10pcs Break-Away 0.1" 2x20-pin Strip Dual Male Headers for Raspberry Pi Zero GPIO (Long 11mm/0.43"), Freenove Ultimate Starter Kit for Raspberry Pi 4 B 3 B+ 400, 561-Page Detailed Tutorials, Python C Java Scratch Code, 223 Items, 72 Projects, Solderless Breadboard, All customers get FREE Shipping on orders over $25 shipped by Amazon, Single Board Computer RAM Memory Technology, Single Board Computer Connectivity Technology. By default you have two CS pins (CS0 GPIO 8 and CS1 GPIO 7). Your recently viewed items and featured recommendations, Select the department you want to search in, Treedix 2 x 20 Pin Stacking Header Female Pin Header Compatible with Raspberry Pi (Pack of 4), FREE Shipping on orders over $25 shipped by Amazon, 5Pcs Female Pin Headers, 2x20 Pins 2.54m Dual Row Short Pin Headers Connector, PCB Board Pin Header Strip for Raspberry Pi, Vilros Pin Header Set for Raspberry Pi Pico. Starting at the top left of the GPIO, and by that we mean the pin nearest to where the micro SD card is inserted, we have physical pin 1 which provides 3v3 power. Give us more details about what you want to learn! Performance cookies are used to understand and analyze the key performance indexes of the website which helps in delivering a better user experience for the visitors. Thats very important. A mistake can destroy your board in less than a second. These cookies ensure basic functionalities and security features of the website, anonymously.
Without that, you may burn some parts of the circuit, you may have components that do not function correctly, give wrong values, etc. To use these pins with these protocols we need to enable the interfaces using the Raspberry Pi Configuration application found in the Raspbian OS, Preferences menu. If youre interested about Arduino pins, check out this tutorial: Arduino Uno Pinout Guide.
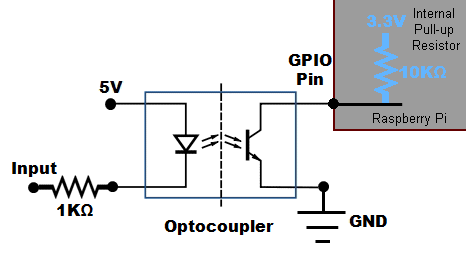
gpio raspberry pi input circuit opto rpi schematic connect optocoupler slotted use resistor io current detector nl open max limit For example, one tiny LED screen might require SPI and another might use I2C (almost nothing uses UART). Why Every Tech Geek Should Own a Raspberry Pi, 25+ Linux Commands Raspberry Pi Users Need to Know, Intel Posts $500 Million Loss for the First Time in Decades as Sales Drop 17%, AMD Gaming Chairs Are Now Available For $579, Intel Kills Optane Memory Business Entirely, BMW's 3,854-Variable Problem Solved in Six Minutes With Quantum Computing. If you order a full 4 or 5 meters, you get the full reel with both connectors installed. These cookies help provide information on metrics the number of visitors, bounce rate, traffic source, etc. However, you may visit "Cookie Settings" to provide a controlled consent. SDA: exchanged data. Note: when you set the mode for a GPIO as output, after booting the Pi, you can expect a different default state for different GPIOs. This eliminates a hardware fault from the project and enables us to start building our project with confidence. Pin numbers are in grey, and GPIO numbers in orange. Give them the gift of choice this Christmas with The Pi Hut e-Gift card! New York, These extra interfaces are activated using device tree overlays and can provide four extra SPI, I2C and UART connections. Now, to use UART in your code, you can use the Serial library in Python, and WiringPi in Cpp. Take a look at ourcustomer service pageif youhave other questions such as "do we do purchase orders" (yes!) Visit our corporate site (opens in new tab). NY 10036. Pay attention here: youll need one CS per slave on your circuit. This cookie is set by GDPR Cookie Consent plugin. As you can see, you get 2 SPIs by default: SPI0 and SPI1. In this case, no problem: you can use the 5V power pin from the Raspberry Pi to power the component, and then use any 3.3V GPIO for the communication. If you read the documentation that comes with a product (provided it has some), it will usually tell you which Pi pins to use. Exact shipping can be calculated on the view cart page (no login required). You can find 2 pins bringing 3.3V and 2 pins bringing 5V. Check out Raspberry Pi For Beginners and learn step by step. This guide has been updated to reflect the new capabilities of the Raspberry Pi 4, which still comes with 40 GPIO pins, but has a few extra I2C, SPI and UART connections available. So, when to use I2C vs SPI on your Raspberry Pi 4? Note that they are certainly not powerful enough to actuate motors such as servo or stepper motors. Note that the SDA and SCL pins on the Raspberry Pi are alternate functions for GPIO 2 and 3. But lets keep things simple here. Analytical cookies are used to understand how visitors interact with the website. Thank you for signing up to Tom's Hardware. In this complete Raspberry Pi 4 pins guide Ill break down all the pins of the GPIO header, and youll learn what you can/cant do with them. A Pi can be powered directly from these pins, and it can also power other 5v devices. And just another word of caution: as previously said in the Ground pins section, dont ever connect one of the power pin directly to one of the GND of the Raspberry Pi 4! Commonly known as Serial, the UART pins (Transmit GPIO14, Receive GPIO15) provide a console / terminal login for headless setup, which means connecting to the Pi without a keyboard or pointing device. Now, you might wonder: how can you configure and use the GPIOs from your code? Thats very simple, its like a switch that you turn on and off. Products that weigh more than 0.5 KG may cost more than what's shown (for example, test equipment, machines, >500mL liquids, etc). So the choice of which ground pin to use is determined by personal preference, or convenience when connecting components. For Python, you can use RPi.GPIO, and for Cpp you can use WiringPi. During checkout, Express Post and International Methods will not be an option if you have that type of battery in your shopping cart. To the point where many libraries use the same function name to actuate those pins! After watching the video, subscribe to the Robotics Back-End Youtube channel so you dont miss the next tutorials! This cookie is set by GDPR Cookie Consent plugin. Get instant access to breaking news, in-depth reviews and helpful tips. While some pins provide electricity, others are grounds and still others connect to different kinds of interfaces, all of which we explain below. JST-XH Extension Cable - 2.5mm Pitch - 500mm long, Multi-Color Micro Potentiometer Knob - Rainbow 10 pack, Step Switch with LED - Three Pack of Yellow with Red LED, Step Switch with LED - Three Pack of Blue Plastic with Red LED, dLUX-dLITE Cool White Skull Shape LEDs 5 Pack by Unexpected Labs, Adafruit ESP32-S2 Feather - 4 MB Flash + 2 MB PSRAM, Adafruit QT Py ESP32-S2 WiFi Dev Board with STEMMA QT, Adafruit ESP32 Feather V2 - 8MB Flash + 2 MB PSRAM. You can fake the PWM from software (ex with WiringPi), but its clearly not recommended as it will take a lot of CPU and wont be really fast. Its much more than that. This means that we can safely power one or two LEDs (Light Emitting Diodes) from a single GPIO pin, via a resistor (see resistor color codes). As you can see, the pin numbers and GPIO numbers are different.

Depending on the library you use to manipulate GPIOs, youll either have to use the number of the pin or the GPIO number. I2C is a master-slave bus protocol (well it can have multiple masters but youll mostly use it with one master and multiple slaves). SCL: clock of the I2C. SCL4 (I2C clock) appears on two different pins: GPIO Pinout for Raspberry Pi 4 and Earlier. MISO: means Master In Slave Out. Heres a complete overview with all the GPIOs and their primary function. GPIO pins have multiple names; the first most obvious reference is their physical location on the GPIO. Youll connect this pin to the RX of the other component. If you dont mix the 5V signal with the 3.3V signals, everything should be alright.
gpio powering digitalexperience hackaday 5v usb And if you configure a GPIO as output, youll be able to write a value to it, also HIGH or LOW. This is the pin to receive data from a slave to the master. Adding this 40 pin header to your Raspberry Pi Board gives you access to the GPIO needed for your projects. Top subscription boxes right to your door, 1996-2022, Amazon.com, Inc. or its affiliates. If you use 3.3V Arduino boards such as Due, Zero, or M0, you wont need to add a 3.3V to 5V level shifter, and you can plug the Arduino pins directly to the Raspberry Pi 4 GPIOs.
They are usually used for I2C communication with an EEPROM. The cookie is set by the GDPR Cookie Consent plugin and is used to store whether or not user has consented to the use of cookies. If you connect a ground (GND) pin to a 3.3V pin directly, well You might destroy your Raspberry Pi board the second those pins are connected together. Controlling a GPIO pin with Python is accomplished by first importing a library of pre-written code. There are at least 2 libraries that will allow you to easily use those pins. The pins 27 and 28 are reserved pins. There are many other available pins for you to use. We're full time makers, with plenty of touch time with Raspberry Pi and Soldering. JavaScript seems to be disabled in your browser. This makes a huge difference, especially when considering real time constraints. Introducing the Raspberry Pi HQ Camera: their third-generation design. Also there are no native PWM on Raspberry Pi. A digital pin has only two states. I love the ESP line-up. Get into the Christmas spirit with our 3D RGB Xmas Tree for Raspberry Pi! How To Use A Geophone With Raspberry Pi and an ADS1115 ADC - Use Sound to Identify Birds Species with a Raspberry Pi - Bi Raspberry Pi - Getting Started with Terminal, Set Up a Geophone with a Raspberry Pi and an ADC (ADS1115), How to Flash the Old 'Buster' Raspberry Pi OS to a Micro-SD, Uninterruptible Power Supplies (UPS) With Raspberry Pi 4 Model B | PiJuice HAT, Upgrade your Project for the Raspberry Pi 4, Identify Birds through Sound with a Raspberry Pi | BirdNET-Pi Project, ESP32 IR-Triggered Camera with Home Assistant Integration. Connect all the slaves SCL to the SCL bus. GND is where all voltages can be measured from and it also completes an electrical circuit. We deliver Australia-wide with these options (depends on the final destination - you can get a quote on the view cart page): Non-metro addresses in WA, NT, SA & TAS can take 2+ days in addition to the above information. Exact shipping can be calculated on the view cart page. Other uncategorized cookies are those that are being analyzed and have not been classified into a category as yet. Youll find out that the pins can be quite similar for some functionalities. For example, to set GPIO 17 (pin 11) as output/high: To make 2 boards communicating with each other, its quite simple: youll configure a GPIO as an input on one side, and as an output on the other side. By clicking Accept All, you consent to the use of ALL the cookies. In more recent times a new library called GPIO Zero (https://pypi.org/project/gpiozero/)has been introduced, offering an easier entry for those new to Python and basic electronics. Data is synchronised using a clock (SCLK at GPIO11) from the master (our Pi) and the data is sent from the Pi to our SPI component using the MOSI (GPIO GPIO10) pin. No matter what you're building, you need to know the Raspberry Pi GPIO pinout, the map and explanation of what each pin can do.
zero rpi pi io raspberry gpio pins pinout pinouts buttons question projects help joe Now with a quad-core 1GHz processor offering a 5x performance increase! If you buy less than a full reel, you'll get a single strip, but it will be a cut piece from a reel which may or may not have a connector on it. PiicoDev OLED Display Module (128x64) SSD1306 Price: $12.25, SparkFun Micro 6DoF IMU - ISM330DHCX (Qwiic) Price: $55.05, SparkFun Micro Magnetometer - MMC5983MA (Qwiic) Price: $27.02, In stock, ships same business day if ordered before 2PM
raspberry pi zero run hat kit paper openbsd wifi chance any 13inch usb arm11 armv6 bluetooth ram features wave broadcom The 3v pin is there to offer a stable 3.3v supply to power components and to test LEDs. On the Raspberry Pi 4 pinout schematics, you can see a column for alternate functions. Those libraries were developed so you can use the Raspberry Pi pins just like you would use Arduino pins, which means that all the complex stuff is hidden and you can use them with just a few lines of code. I wont make the complete list here, but you see the point. And, as for I2C, SPI uses the alternate functions of GPIOs. Here you'll be able to follow along with our s For the best experience on our site, be sure to turn on Javascript in your browser. We'll get into the specific differences between I2C, SPI and UART below, but if you're wondering which one you need to use to connect to given device, the short answer is to check the spec sheet. Also note that BCM and GPIO pin numbering refer to the same scheme.
gpio 1to2 rpi polig Finding a soldering iron when you've got no clue. We're here to help! For each GPIO you have at least one alternate function, and sometimes many more. Most of the sensors, motors, lights and other peripherals that make these projects possible connect to the Pi's set of GPIO (General Purpose Input Output) pins. The master is the Raspberry Pi, and the slaves are all connected to the same bus.
This is the pin to send data from the master to a slave. A flexible, powerful family of microcontroller main-boards.
TX for Transmission. Discover more about the small businesses partnering with Amazon and Amazons commitment to empowering them. The best thing about any Raspberry Pi, including the newRaspberry Pi 4, is that you can use it to build all kinds of awesome contraptions, from robots to retro gaming consoles and fart detectors. These cookies will be stored in your browser only with your consent.