import, How many neopixel LEDs are lit at one time, and, NeoPixels must be connected to D10, D12, D18 or D21 to work, For NeoPixels to work on Raspberry Pi, you must run the code as root. import, # put the LED object into a horizontal strip In the case of these breadboard friendly Neopixels, the wire is a simple female to female jumper wire. 11. How much does it cost to manufacture a conductor stone? This isnt the most secure connection but for long strips like this connected to the wall, they dont tend to move around a lot. Press and hold the BOOTSEL button of the Raspberry Pi Pico and connect via USB to your computer. When it hits 10, the loop ends. 7. The best Raspberry Pi yet - with 1GB, 2GB, 4GB or 8GB RAM! As well as the data pin there is a 5V pin, labelled + and GND pin labelled G, this is what you use to power the Neopixels. 3. Wrap the thread around the ring or the Neopixel three times. Use another bitbang to set the LEDs green, then add another pause.
adafruit neopixel rgbw 60led I think they have so much potential for creativity, especially when connected to a Raspberry Pi. In our very first MicroPython tutorial, we learned how to blink an LED but we could only turn it fully on or off - we didn't have the ability to change its brightness or colour. Whats great about these Neopixels is the wire can be a different length. Ranging from single LEDs, to matrix arrays and a variety of sewable components that can be used on wearable products. This example demonstrates using a single NeoPixel tied to a GPIO pin and with The direction of power does not matter. Learn how to sync your ESP32 with network time! 4. From the Category menu (left) click on Serial. When it comes to the Raspberry Pi Pico our choice is a little more limited, but now we can add one more to the list.
BASIC, Beginners All-Purpose Symbolic Instruction Code is a high level, human readable language originally developed in 1964 by John G. Kemeny, Thomas E. Kurtz and Mary Kenneth Keller at Dartmouth College. Change), You are commenting using your Twitter account. I go with a 5V, 4A power supply for my strips of 60 lights. Assumption of Mary (Mari Himmelfahrt) in Munich, what is closed or open? Copyright Euphoria LTD 2014. Use the Bitbang command to simulate the WS2812 timing necessary to set the LEDs red. The array is RGB, with the value indicating the brightness magnitude (0-255). There is an awesome Neopixel library available for the Raspberry Pi Pico which we can use - this allows us to dive right into creative coding instead of fiddling with the command protocol details. We want to bring in the code from neopixel.py so we can use this library. Keep your sewing really tight. We use the range function in python to create a list of hues from 0 to 65535, in steps of 500. The Mite term comes from the creator, Geoff Grahams range of Maximite and Micromite boards which use Arm based SoCs to power powerful home computers which run a flavor of BASIC. It gives great examples of looping code and changing colours. Remember: keep it tight and dont cross any wires. If you've ever worked with colours in code or in Photoshop before, you may be familiar with these. The Cathode (short leg, GND) connects to any GND pin on the Pico via a 220 Ohm resistor. Lights are cool. the Adafruit library and driver bundle. You can fit a male pin in the black and white connector so this is what I use to connect the strip to the pi. What if we want to run our code when the Raspberry Pi Pico is away from a computer? In our very first MicroPython tutorial, we learned how to blink an LED but we could only turn it fully on or off - we didn't have the ability to change its brightness or colour. This is a Let's start a new MicroPython project in our favourite simulator, Wokwi. A blank screen with a prompt is all that greets. MTN Mobile Services We support women groups, with loans and coaching them to build strong businesses, Western Union Transfer with Bonzali Rural Bank, MoneyGram Transfer with Bonzali Rural Bank. for, # Python Neopixel Matrix Presentation To learn more, see our tips on writing great answers. Make sure youre connecting Data Out (O) to Data In (I), G to G and + to +. Its just basically bare wire. This opens a basic text editor and at the bottom of the screen we can see that the function keys are used to Save, Run, Find, Mark (highlight for cut/copy) and Paste. For simplicity I have set the saturation and value/brightness to the maximum for all 3 colours. We see in the chart that pure red = 0, pure green = 21845 in the top left, and pure blue = 43691 in the bottom left. Transform characters of your choice into "Hello, world!". Comments, remarks in BASIC parlance, are ways to leave messages in our code. Turn off the pi! 4. on the web) is equivalent to (0x10, 0, 0). The tech landscape changes dramatically every 5-10 years. Press CTRL+C to stop at any time. Depending on the type and manufacturer of the neopixels the result will look a little different. The library is open source and can be found on blaz-r's github repository. If this is your first time using Python or I2C hardware on a Raspberry Pi, please checkout our tutorial on Python Programming with the Raspberry Pi and the Raspberry Pi SPI and I2C Tutorial. That's where the magical Neopixels - also fondly known as WS2812Bs - come in. Type run to start the code. I'm getting the error message: ws2811_init failed with code -11 (Selected GPIO not possible) You can chain multiple ones together and then address them in the order they are chained (more on that later). 8. This is a basic example setting the first, fourth, and fifth LEDs. How to assemble ourPassive Cooling Casefor Raspberry Pi 4! Saturation measures how much of the colour is present, i.e. Change). We then fill the pixels with each colour and remember to use the show method to send the command to the Neopixel ring. O for standard, and B for the WS2812B version. In the loop, we 'fill' all the Neopixels with each colour every half second, so it cycles between red, green and blue. 9. Click the 'plus' button at the top of the pane and select the Neopixel Ring from the menu. For the ultimate Christmas jumper you need sewable Neopixels. BASIC came to prominence in the late 1970s, thanks to the rise of home computers.

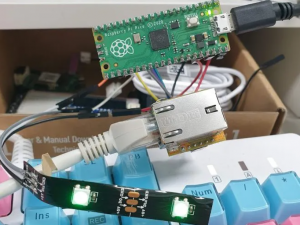
NY 10036. As this is a Raspberry Pi Pico, we can do much more than print strings of text. You could connect it to those wires next to the data wires. When you purchase through links on our site, we may earn an affiliate commission. # Once soldered, these Neopixels are very easy to connect to a Raspberry Pi. BASIC can use labels or line numbers, going up in steps of 10, to indicate positions in code. Here you will definitely need a separate power supply. You'll need to buy them separately. The Raspberry Pi will supply data. Adafruit has a very detailed guide for installing the Neopixel library. white is 0xffffff but is actually (0, 0, 0, 0xff) in the tuple syntax. They will pull more current than it can provide. For anything that needs more than a few Neopixels you will need to power them separately. You could create the most fantastic shows of light and colour! MMBASIC has access to the GPIO. The first thing we see with MMBASIC is nothing. I bend the bare wire back itself so I get the thickness of the jumper wire to crimp onto. This opens a basic text editor. 3. identical. DIN, which stands for "Data IN" and needs to connect to any digital I/O pin on the Pico so we can command the Neopixels. to set values similar to colors on the web. More like San Francis-go (Ep. What is "Rosencrantz and Guildenstern" in _The Marvelous Mrs. Maisel_ season 3 episode 5? List the projects saved to the PicoMite. Was it always like this? This makes sure that our code is correctly saved. To install for current user: To install system-wide (this may be required in some cases): To install in a virtual environment in your current project: This example demonstrates the library with the single built-in NeoPixel on the The code for this project is a little more complicated as we shall be using arrays (groups of variables essentially) to control the color of each LED in a chain of six. Scroll down to Ports (COM & LPT) and click on the drop down arrow. Now we have thousands of programming languages to choose from. Open PuTTY and click on Serial. Site design / logo 2022 Stack Exchange Inc; user contributions licensed under CC BY-SA. VCC, which we'll connect to the Pico's 3.3V supply pin (pin 36 on the right side of the. Notice that the sleep time has been reduced from 0.5 seconds to 0.05 seconds so that the pattern cycles faster through the spectrum. Saturation and value seem to have a sensible numerical scale, but how do we know which hue corresponds to which colour? It has 4 pins: Connect your Neopixel ring to the Pico as shown in the image. Turn the LED connected to GP0 on, and use a print command to write On to the screen. Tom's Hardware is part of Future US Inc, an international media group and leading digital publisher. It's as if someone took a rainbow and wrapped it around a bicycle tire (hey, that's another great Neopixel project idea!). If you dont have neopixels or if what to simulate neopixels then the Python Tkinter graphic library can be used to create a variety of different arrangements. Weekly product releases, special offers, and more. Higher level NeoPixel driver that presents the strip as a sequence. Chop it off. DOUT, which stands for "Data OUT" and is used for connecting additional Neopixels downstream of this ring (e.g. In that repo, we are mainly interested in the file neopixel.py. 7. Or what if we want a lamp to automatically turn on, like an alarm, every morning?
pico neopixel pi w5500 wiznet hackster There are two sides to the Neopixel in and out, labelled as I and O. So you can control the gaps between each light. Finally close the loop, instructing the code to go back to the label. 2. Is red 27, or 34798, or something else? You need to install circuitpython first. 4. Use this command to set the LED Blink code in slot 2 to load on boot. Its tricky and definitely turn the Raspberry Pi off when youre doing it. normal Python sequence and features slice support, repr and len support. Thank you for signing up to Tom's Hardware. Copyright 2017 Scott Shawcroft & Damien P. George rev2022.8.1.42699. Another way is to hack a jumper wire to have a ring terminal on one end and a female connection on the other end: Now you can wrap your conductive thread around the ring terminal and connect the other end to a pin on the Raspberry Pi. On supported GNU/Linux systems like the Raspberry Pi, you can install the driver locally from Neopixels can pull up to 60mA of power but realistically unless youre putting every light on full brightness and full white all the time, its more likely they wont pull any more than 20mA. Controllable multi coloured lights are awesome. Note that bpp does not Type edit and press Enter. For the addressable LEDs, we will be using Adafruit's neopixel python package. This example demonstrates the library with the ten built-in NeoPixels on the 3.
The only difference is that instead of jumper wires you have conductive thread. how blue is the blue or how red is the red, and has a value assigned from 0 for unsaturated to 255 for fully saturated. Metro M0 Express. Its a Neopixel. So far this HSV system seems like a more complicated way to represent colour, and you may feeling like cursing me under your breath for showing it to you. But how exactly do we "mix" the colours? Be among the first to hear about new product launches, discount codes and more! Future US, Inc. Full 7th Floor, 130 West 42nd Street, Neopixels can be used on custom lighting applicatons, for example I used them on a water fountain project.

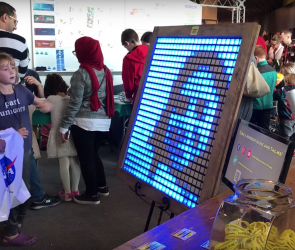
Multi coloured lights are very cool. present by setting the RGB channels to identical values. 4. In this blog I will be looking at setting up neopixels components on Raspberry Pis, and then I will show some soft neopixel layouts using the Python Tkinter graphic library. Modify your main loop to the one below so that you can loop through all the hues in the spectrum. We don't need to connect this for now. The overall neopixel string has a 10% brightness. Its only the data wire that has to go into the In side of a light strip.
adafruit stepper featherwing moteurs 2927 reversing motorized My code is: gpio readall tells me BCM Pin 18 is GPIO 1 so I set the pin to 1. This is a basic example cycles through the LEDs individually setting them green. What rating point advantage does playing White equate to? Below is an example of a soft matrix neopixel application. 2. The WS2812 option has two settings for Neopixels. 4. Please refresh the page and try again. NeoPixel uses the Board Pin numbers, not GPIO numbers. 9. Found the error. Value refers to the brightness of the colour, where complete darkness is represented as 0 and full brightness is represented as 255. a pixel_order to specify the color channel order. 5. Whats some more soldering between friends?! Crimp it to a ring terminal. We have digital, analog, PWM, I2C, SPI, RS232 and 1-Wire. HSV can be harder to understand but I think Wikipedia does a great job of visualizing it. Look for the IN end of the strip. Now this is a MicroPython coding tutorial, not an installation-art course, so I'll leave the creativity to you! Create a for loop that will iterate ten times. Let's watch it in action! Type run and press Enter to start the code. Good for stroppy toddlers. Great, we've just made a tacky storefront sign from the 1990s. PicoMite is a more lightweight product, designed for the $4 Raspberry Pi Pico, enabling BASIC code to control and work with GPIO pins, sensors, RGB LEDs and other components. This guide includes how to setup a Raspberry Pi from the very beginning without a monitor. Visit our corporate site (opens in new tab). Revision a9379c3d. Over time, BASIC faded into the shadows for many. Remember this will be the title of the code in slot 3. Neopixels are addressable full-colour RGB LEDs that come in a variety of different arrangements. (LogOut/ Same size headers, just a single row of 3 on each side of the Neopixel. A flexible, powerful family of microcontroller main-boards. Add a pause, using the value stored in delay. 7. document.getElementById( "ak_js_1" ).setAttribute( "value", ( new Date() ).getTime() ); # Python Neopixel Single Strip Presentation Black is ground, red is power and white is data. I found that the Arduino neopixel library to be much more stable and considerably faster than the Pi version. New York, We need to create a file to do more with the code. Guess what they do?! In the 1980s, the boom in home computers saw machines from Atari, Apple, Commodore, Acorn, Sinclair et al all looking to introduce computing to a generation. On systems that support PyPi installation via pip3 (use pip for Python 2) is simple, using the following commands: For all users (note: the user must have sudo privileges): Before users jump into operating the LEDs, it is recommended that they review the the Read the Docs documentation for the Python package and datasheet for the WS2812B LEDs. Encode the systematic binary VarshamovTenengolts code. If this setting is not enabled, the backspace key is deactivated. The famous red boards are now at The Pi Hut - check out our SparkFun range! Create an array (Python calls this a list) which will contain the six values for each of the six Neopixels that we wish to control. All rights Reserved. more Neopixel rings). In the setup section, we create a Neopixel object that controls 16 LEDs on pin GP6. There is a Neopixel library for the python for the Raspberry Pi. This allows us to write multiple lines of code to set up the colour pattern exactly as we want it before sending it all at once to the ring. By setting the 3 intensities appropriately, we can produce any colour at any saturation and brightness. And you can also connect it to the other end of the strip. Heres why you can trust us. Inside the for loop, add a print command to print a message to the screen. PicoMite has seven slots into which we can save code. Contributions are welcome! Let's try this in the Wokwi editor. Chop of its head! I also had a pair of shoes that changed colour when I got a tweet or text. If Im not sure my code is working I find these are the quickest and easiest Neopixels to connect to a Raspberry Pi for testing. And we poor software developers have to constantly run and re-skill just to catch up. If you have a Raspberry Pi Zero with no pins soldered on then you could wrap the conductive thread through the holes on the pi. Also, one important feature of Neopixels/WS2812Bs is that they're individually addressable. Above the code editor, click on the little arrow on the right and select 'New File'. My stair lights connect to a Raspberry Pi which checks the outside temperature for my house and displays certain lights at certain temperatures. Save the code to slot one of the onboard memory. Find centralized, trusted content and collaborate around the technologies you use most. tuple syntax. Where developers & technologists share private knowledge with coworkers, Reach developers & technologists worldwide, Raspberry Pi Neopixel "Selected GPIO not possible", Measurable and meaningful skill levels for developers, San Francisco? I havent found a small enough ring terminal that this works on. What if you want to remote control a drone, or create a smart home lighting system, or collect sensor data from many devices? Enter MQTT: a robust and flexible IoT protocol that lets us do all that and more! Use a GoTo command to send the code back to Blink_Loop, closing the loop. But with the headers and wires together they are quite bulky and awkward. If you weren't around back then, you're very lucky. Overwrite the code in slot 3. Notice on line 18 that we must use the show method in order to actually send the command to the Neopixels.
remotely sessionize Its now more like a A strip of Neopixel can look really impressive going up your stairs. However, you can also use int hex syntax Get into the Christmas spirit with our 3D RGB Xmas Tree for Raspberry Pi! What if we want to blink an LED to remind us on the day of a friend's birthday? denotes that our array contains Integers, and each is an RGB value, in this case red. You read that right! By clicking Accept all cookies, you agree Stack Exchange can store cookies on your device and disclose information in accordance with our Cookie Policy. The famous UNO Rev 3 - a fantastic first Arduino board for beginners, A small, complete, and breadboard-friendly Arduino board. Everything you need to start using the micro:bit - includes a micro:bit V2! From the Category menu, click on Keyboard and set the Backspace key to Control-H. We treat Our head office have strong and dedicated staff with extensive and insightful knowledge in the banking fraternity, Our business development staff are trained professionals, dedicated to making your business run better. To add the power supply: strip off a bit more wire from the red and black wires. Hue refers to the colour itself as we'd see it in a rainbow, and each colour has a numerical value assigned to it from 0 to 65535. I chose pin GP. API documentation for this library can be found on Read the Docs. Setting There was a problem. Create a label, Blink_Loop: which indicates the start of our looped code. You will receive a verification email shortly.
By printing a message to the screen we can see that the loop is working, should our LED circuit be incorrect. To load the Raspberry Pineopixel libary comes from the nice people at Adafruit, and it is loaded by: It is important to note that neopixels can draw a lot of power so consider looking at using external 5V power for projects with a lot of LEDs. off auto_write so that all pixels are updated at once when the show If you do have issues, please tweet/DM me and I'd be happy to help you out . You can make all the colours of the rainbow by just mixing red, green and blue light in the right proportions. https://learn.adafruit.com/adafruit-Neopixel-uberguide/python-circuitpython#python-installation-of-Neopixel-library-17-9, Note: I followed these steps (on 15th November 2018), but they didnt work for me - I had to install this library separately. Connect your power supply and power up the pi. 5. Note: these particular Neopixels dont come with headers. They come in lots of different lengths and have a protective covering around them. Copy the PicoMite UF2 firmware file to the RPI-RP2 drive. 5. The Neopixel library provides two ways to numerically represent colour: RGB (red-green-blue) and HSV (hue-saturation-value). Our Neopixel ring may not be as tacky as before, but I think it's still about as stylish as a child's light-up sneakers from the early 2000s. This will increase the value of i each time the loop iterates. Let's start by testing out if the Neopixel library is properly uploaded and available for our code to access. The default signal in wires to Pi pin 18. (LogOut/ Connect and share knowledge within a single location that is structured and easy to search. is the French certificate of renewal of CNI enough to prove my identity in Switzerland. Until then, if you have any questions, feedback, or just want to chat, just hit me up on my Twitter If you'd like to be notified of new tutorials, click Follow/Subscribe below and they'll be in your inbox once a week Sayonara! For full, independent, control of each color component use the Our head office have strong and dedicated staff with extensive and insightful knowledge in the We serve you fast, there is no reason for our customers to delay in our banking hall. Load and Cash-Out Your E-Zwich Transactions, Rewarding some loyal customers of the Bank. There is no soldering involved here, just sewing. Ethical implications of using scraped e-mail addresses for survey. 8. 4. 1. 17. Use it to get acquainted with the Wokwi simulator interface so that you are prepared to dive into this tutorial). Close the for loop using Next. All the remaining colours lie on the spectrum in between these. The Neopixel strip (just like the individual Neopixels) needs data, power and ground. But from here we can write BASIC code, line by line, which runs each time we press the Enter key. Let's say that we want the LED blink project to load when the PicoMite is powered up. When writing Neopixel code with fun patterns, I find it's actually easier to control the Neopixels using HSV colours rather than RGB colours. In the case of the ones in the simulation, the protocol scheme is "GRB". For information on building library documentation, please check out this guide. This is how Neopixels work their magic.
pico Set your serial configuration as follows.