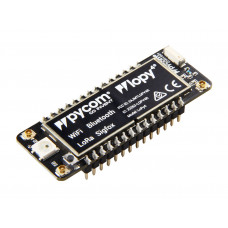
I connect it to a FiPy via I2C then forward the readings to my server over MQTT. In this tutorial, however, we will limit ourselves to reading out the sensor and will therefore only assume the parts that are absolutely necessary. #publish.single("/Garden.Pi/WaterFlow", flow, hostname=MQTT_SERVER), Raspberry Pi per Solarzelle und Akku mit Strom versorgen, Lecture des tiquettes RFID RC522 de Raspberry Pi (NFC), How to build a ESP8266 Scale (with Weight Sensor HX711), How-To: Bluetooth Connection between ESP32s and Raspberry Pis, How to create a Solar Powered Raspberry Pi Bitcoin Miner, How to build a Smart Agriculture System using IoT. Cool to hear about your project. Maximum current:15 mA(DC 5V) I've also used these in my Raspi Smart Kegerator.
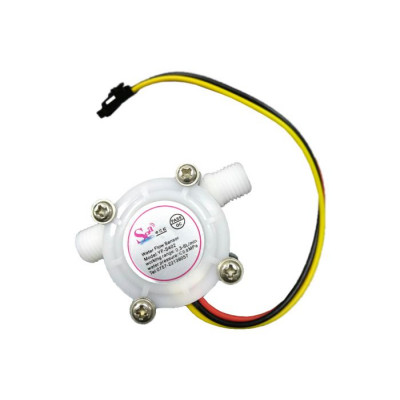
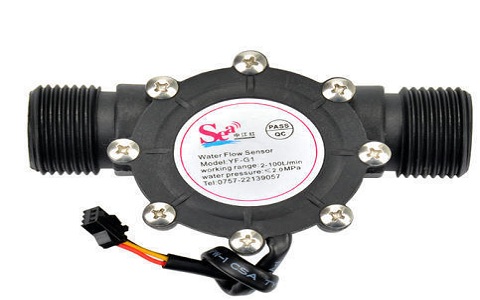
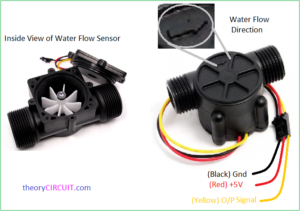
If I read it using pulses_get I cam able to get occasional sets of data, but not consistently. There are two ways to do this: In the data sheet of the sensor we find different information, of which the most important are: The connection to the Raspberry Pi using a jumper cable is easy thanks to the three pins: Although at least 3.5V is required according to the data sheet, I was able to read the signal successfully even at 3.3V. Pololu mini pushbutton Power Switch Very interesting tiny board. Do not forget - it's open source software.Ok, after several hours I found the solution. # Pulse frequency (Hz) = 7.5Q, Q is flow rate in L/min. The ultrasound receiver (echo pin) receives the reflected sound (echo). As per the device's datasheet, the minimum working voltage for your sensor is 4.5 VDC, so I don't think it would work with it connected to 3.3 VDC. Output Waveform:Square Wave,output pulse signal. Connect to it with your PC or phone, then go to IP address 192.168.4.1..
sensor yf flow water s201 arduino measurement pakistan meter effect hall flowmeter counter pk sensors modules components Sensor:Hall effect. So the idea is to use one ESP like a hub for connecting other ESPs. Secondly, what was an indicator that they were not holding up? BorisV2, please don't take my common the wrong way. Tried it with the pump on, but it starts building pressure, max, later on less flow, so not sure how I can fine tune this.

If you have the same converter as me, then by itself you need to change the switch to the "Prog" position. 1. https://github.com/Liamhanninen/WaterFlowMeter.

Dear @JSGora, did you find some solution for the flow water sensor? Ok, now we are ready for uploading the micropython scripts to ESP8266. The principle of operation of the simplest sensors is that water has to short two (or more) metal pins, and as soon as it happens, alarm triggers. It means that file have been uploaded. Regarding the example code with the RPM class, it looks like it should work With a little help from someone at work I was able to get the RPM code running and print values however I am only reading zeros. These flow meters are so cool. According to the spec sheet on the website: Frequency: F=7.5 * Q (L / Min) error: 2% current can not exceed 10mA, 450 output pulses/liters, F=Constant * units of flow (L / min) * time (seconds) Either way good luck with the build. To do this we will use esptool. 6.

For example did they start providing inaccurate readings or just stop working/not return any value? And I stayed with Pushover. Normally those modules comes with factory firmware. After you have made main setup on "System" page, click "Notifications".
arduino A subreddit for discussing the Raspberry Pi ARM computer and all things related to it.
This value can deviate (in the linked data sheet it is more like 8-8.2 Hz) and should be adjusted accordingly. HT7333 3.3V MS Low Dropout Linear Regulator Power Supply modu. This is the unique reference to this device and we need it later in our Python script to address notification. By-the-way, before I retired, I reversed engineered many old circuits and modernize them with new circuit designs including micro-controllers and programming as well. Next step is to install Domoticz server on your PC. In my case it is COM5.
meter esp8266 gsm how2electronics controlled As soon as the sensor sense water, ESP switches on and sends request to Domoticz server in JSON format. So, take your RPi and install operating system suitable for running Domoticz server. it is possible to communicate with modules by using so called AT commands. 5. Probably why you're getting zeroes, because there's nothing on the output of the sensor. I started by trying to program event on the /device/ page.
xbotics 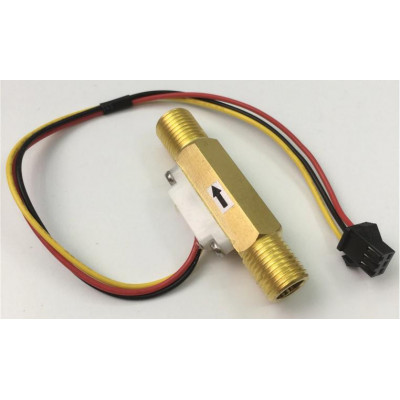 electronicscomp
 18650 battery is a good choice also. I suppose this feature here is not finished yet. Does It have I2C address. Then "Pololu board" switches on, and gives power to the voltage converter. Vua lia! This on below isn't mine, but it's ok to illustrate.
NoScript). :) It works.
sensor The same also applies to hose connections: If you want to connect water hoses with different dimensions, you can print these connectors yourself. So .7 liters would be about 3 cups so instead of 200 rotations per cup (for my project) it would be about 330. Also normally you need API key for notification to work. Implement battery level alarm. But thumbs up all the same. Housing7. All Rights Reserved, ESP32 NodeMCU with HC-SR04 Ultrasonic Sensor with Arduino IDE, MicroPython Programming with ESP32 and ESP8266, Installing and getting started with Thonny IDE, Flashing MicroPython Firmware with esptool.py, Flash/Upload MicroPython Firmware to ESP32 and ESP8266, MicroPython: Program ESP32/ESP8266 using VS Code and Pymakr, MicroPython Programming with ESP32 and ESP8266 eBook, ESP8266 NodeMCU with HC-SR04 Ultrasonic Sensor with Arduino IDE, Complete Guide for Ultrasonic Sensor HC-SR04 with Arduino, Flashing MicroPython Firmware with esptool.py on ESP32 and ESP8266, MicroPython: OLED Display with ESP32 and ESP8266, MicroPython: SSD1306 OLED Display Scroll Functions and Draw Shapes (ESP32/ESP8266), Getting Started with Thonny MicroPython (Python) IDE for ESP32 and ESP8266, Getting Started with MicroPython on ESP32 and ESP8266 (uPyCraft IDE), [eBook] Build Web Servers with ESP32 and ESP8266 (2nd Edition), Build a Home Automation System from Scratch , Home Automation using ESP8266 eBook and video course , ESP8266 NodeMCU Web Server (WebSocket) with Multiple Sliders: Control LEDs Brightness (PWM), Connect ESP32 to Cloud MQTT Broker (TTGO T-Call ESP32 SIM800L), MicroPython: MQTT Publish BME280 Sensor Readings (ESP32/ESP8266), https://randomnerdtutorials.com/esp8266-nodemcu-hc-sr04-ultrasonic-arduino/, https://randomnerdtutorials.com/getting-started-micropython-esp32-esp8266/, Build Web Servers with ESP32 and ESP8266 , TTL pulse proportional to the distance range. To make it work faster. In our case notifications has to be send as soon as water was detected by the sensor. Had to add a potentiometer just so I could continuously calibrate these things. The device stands in off state until water shorts "Water sensor" pins.
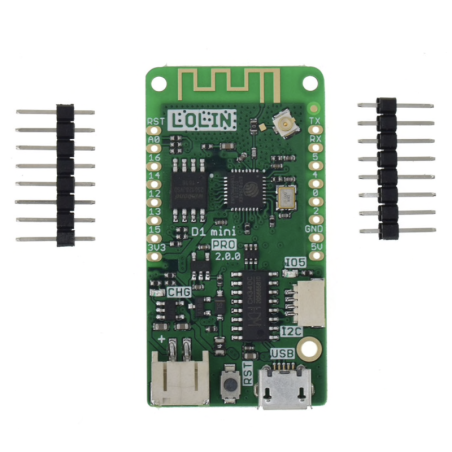
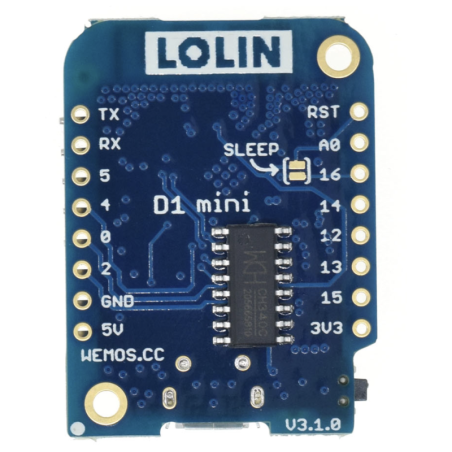
lolin 16mb nodemcu wemos wifi micropython lolin wemos iot micropython nodemcu 4mb esp8266 esp8266ex Obviously you need to run in your terminal : And that is it :) more or less. Can u suggest some hints to me. The new hardware should be in the list and there should be a button "Create Virtual Sensors".
It let us switch the ESP module only when water is detected. Devices will not show up until the appropriate hardware is added. But there is an easier way :).
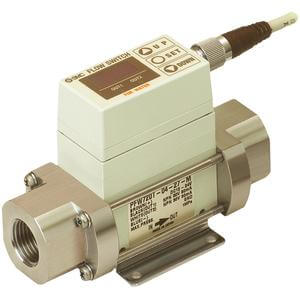
smc ifw pfw corporation lpm ip65 flussostato integrato Latter I will tell why. Now we need to program "event" for our sensor. If anyone is able to give me guidance in the right direction I would be greatly appreciated! If you water your beds, you definitely want to know how much water has flowed over time. https://www.digiten.shop/collections/counter/products/digiten-g1-2-water-flow-hall-sensor-switch-flow-meter-1-30l-min, https://core-electronics.com.au/tutorials/pycom/hc-sr04-ultrasonic-sensor-with-pycom-tutorial.html, https://atlas-scientific.com/embedded-solutions/ezo-embedded-flow-meter-totalizer/, https://iconprocon.com/product-category/flow-meters/. If you believe that you will check some check boxes and it will work, you are wrong :) It doesn't work in this way.
 esp8266 iot
 I'm not sure if this is a limitation of the 3.3V or that I am headed down the wrong path with the code: I tried several versions of code reading DHT sensors with Time / Interrupts, but I had no success getting anything to report back from the flow sensor.

Than we need to connect our module to PC to erase firmware. Your browser does not seem to support JavaScript. I was only stating how easy a simply leak detector can be made. While I am sure your project accomplishes what you designed it to do, and it works like you planned using a micro-controller approach, a very simple two transistor circuit can work just as well and without any programming or daisy chaining of little PC assemblies.
We will need to upload files: In command line type: ampy --port COM5 put C:\path to your file.
flow sensor water s201 yf meter arduino fluid buysnip connection flowmeter effect hall india wishlist sensing Did you make this project? Enable the device by clicking green arrow on the left (on my picture below it is blue, because of the device enabed).
 esp32 hc sr04 micropython sensor ultrasonic diagram circuit
 Running ahead a little bit, I will say that I tried Pushover, Pushsafer and Pushbullet. Raspberry Pi vs. Arduino: Which One is Best (for Beginners)? Any code editor you want. This an app with user interface, allowing to upload files to ESP modules.
nodemcu iot micropython wemos 4mb lolin esp8266ex It is powerful enough for running Domoticz server.
solenoid q50c Some time ago, my wife asked me to make a water leakage sensor. Now we can proceed to assembling all parts together, according to the block diagram below.

Press question mark to learn the rest of the keyboard shortcuts, https://github.com/Liamhanninen/WaterFlowMeter. So I wanted to share my code - I think this can be such a useful device/project. document.getElementById("comment").setAttribute("id","a449a099841c4244dc0c1c18be9c55c4");document.getElementById("jc72354ab5").setAttribute("id","comment"); Save my name, email, and website in this browser for the next time I comment.
(function(d,s,id){var js,fjs=d.getElementsByTagName(s)[0];if(d.getElementById(id))return;js=d.createElement(s);js.id=id;js.src="//connect.facebook.net/de_DE/sdk.js#xfbml=1&appId=714022738696405&version=v2.0";fjs.parentNode.insertBefore(js,fjs);}(document,'script','facebook-jssdk')); Type above and press Enter to search. Create an account to follow your favorite communities and start taking part in conversations. These are: In order to be able to connect a hose, we need a so-called tap connector. Thanks for the idea! It was obvious without a phone alert. I have programmed the sensor to send alarms every 30s, if water was detected. Fun project to program and play with.
From my 15 years of experience as an medical engineer, I know that easiest way of detecting water is metal pins shorted by water. Here is an Arduino example of what I am trying to do: I have the following sensor: https://www.digiten.shop/collections/counter/products/digiten-g1-2-water-flow-hall-sensor-switch-flow-meter-1-30l-min. Have you noticed any missed steps or are the numbers sane? You can find the exact setup and the code for it in this tutorial. MQTT is very suitable for this, as we can communicate via an interface.

And also this software do not allow to use modules like standalone controllers. I currently have it plugged in to 3.3V and GND with Data going into P16. I was able to modify this tutorial: https://core-electronics.com.au/tutorials/pycom/hc-sr04-ultrasonic-sensor-with-pycom-tutorial.html to receive back some data but it only reads values at a very low speed and then stops reporting at higher 'speed'. Also you will need an app on your cell phone or PC. I wasn't able to find code for this that worked for me. I've only had one leak in my entire life time, and I didn't need any phone to tell me about it.

With the pot, are you talking about calibrating the temperature sensor? And I as a true engineer undertook such a sensor to do. The GPy's pins can only receive an input of up to 3.3 VDC, so you will need a voltage divider prior to your input pin to bring the voltage down. According to datasheet there should be 3V to 3.6V input. Very simple. So in this case if you try to upload another file, sometimes upload process will be failed. To do this you need TTL converter + few additional components. Here you can connect your ESP to local WiFi network. Domoticz setup, Now that our server is ready, we can access it from any web browser, including from a tablet by entering the following URL: http://IP_domoticz:8080, Now that our server is ready, we can access it from any web browser, including from a tablet by entering the following URL: http://IP_domoticz:8080. Will you be plugged into city utilities or have your own tank?
5v g1 sensor flow water cpc compare There is also an inexpensive variant that we can quickly read using the Python programming language and also integrate into our smart home system. But I did not succeed with this on Raspbian on my Raspberry Pi. 3. So, put the switch on the TTL converter to "UART" position. The Setting menu with various tabs allows you to enter personal parameters necessary for a better system functioning. My desired output would be in L/min. You can track the process in "Setup"/"Log". 2. Looks like your connection to Forum was lost, please wait while we try to reconnect. After ESP starts, find a new WiFi network called "Wifimanager". My "event" is shown on the picture above. Only users with topic management privileges can see it. I have a Gpy with expansion board V3.1. Yes this is also great visibility into how much were using for specific things like our showers (4-8 gals), the washing machine (about 14 gals), and flooding the toilet (about 3 gal I think). You do not need to keep ESP ON. However, I do like your idea and glad to see younger people getting into both electronic and programming. Ampy installed, for flashing your program, 4. User will have to push a button, and the battery level will be shown. Using the example of OpenHAB, this is particularly easy, since a lot is already included. There is no one way only issue for most anything. We need to use "Events" from "Setup" drop-down menu. This is really cool! USB to ESP8266 ESP-01 Wi-Fi Adapter Module w/ CH340G Driver.

Before you can use the Domoticz application to control devices or read sensors you must setup the communication to hardware device(s). That fact that you want to have your phone alert you about such a leak is a good one as well. You can check list of files on ESP by ampy command: From my experience it is better to upload main.py after you have uploaded all necessary files. As a result, your viewing experience will be diminished, and you may not be able to execute some actions. Working voltage range:DC 5-24 V
thank's, I am using the industry's most comprehensive range of corrosion-free a paddle wheel flow meter which are cost effective, excellent compatibility with liquids, foam, vapor and can offer low current consumption for battery powered applications. Click this button and choose Sensor Type "Alert".Now we have to add the device in Domoticz to become active.
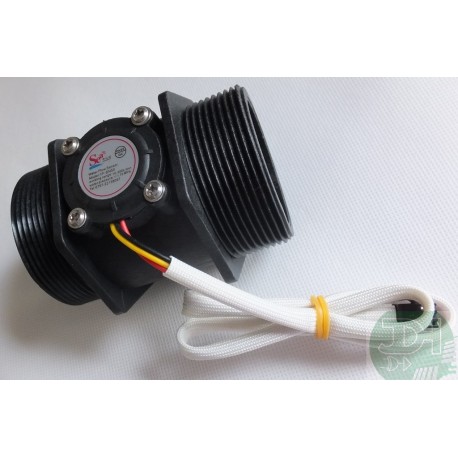
 flow liquid sensor dn50 flowmeter pipes liters min inch larger
 The ultrasound transmitter (trig pin) emits a high-frequency sound (40 kHz).
-350x350.jpg)
Next ESP switches on, and sends a message to Domoticz server. Flow range:1-30L/min
You can test notification by clicking "Test". Load capacity:10 mA(DC 5V) Notify me of follow-up comments by email.

Now all that remains is the connection of the hoses.

The advantage of using 1st way, is that it is more flexible. Seems like a good option since the flow processor will keep totalizing if your LoPy restarts. In this case the IDX number is 1. Choose WiFi network you are going to use, type in password, hit "Submit". 1. I've successfully connected to LTE over hologram and wifi to PyBytes. Also, you have to be careful when connecting the signal of the sensor into the GPy, because the sensor will output a square wave between 0 and Vss, where Vss is the supply voltage for the sensor (5V for example). Actually you can use any other suitable power source. Plug the ESP8266 module into the TTL converter as shown on the picture, and connect it to the USB port.
nodemcu lolin wemos 16mb micropython After clicking "Events" you can create your own event. Depending on the project, you will be using a few other hardware parts. Fill in name of the device, and click "add". Depending on the data sheet and implementation, values per pulse frequency (Hz) of 7.5Q are found, with Q indicating the flow rate in litres/min. If it finds an object, it bounces back to the module. Let's start from flashing our ESP8266 module.
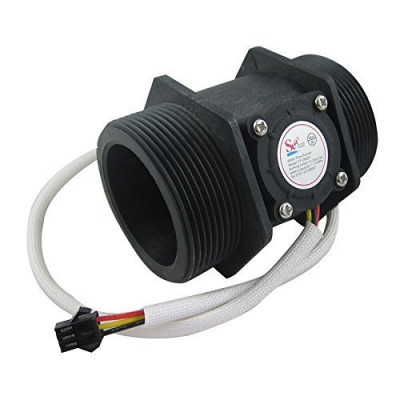
 flow sensor water 65mm system pipe hole weight shipping
 If API key is correct, you should get a test notifications to your cell phone. Press J to jump to the feed. I used the same sensor with an arduino and some other hardware to make a sprinkler system that detected leaks for a project in school.
This is a really useful way to monitor water usage in the RV I'm building.
yf s201 arduino 5v flow water g1 sensor compare Thumbs Up! I feel like that is what I should capture with the follow code, but that is not the case. She was afraid that the hose in the boiler room can be leaky, and the water would flood the newly laid wooden floor. You need to have an account on Pushbullet, Pushover or other pages you would like to use. This power module based on HT7333 chip, converts voltage to stable 3.3V for ESP8266. Shorty you have to receive a notification on your cell phone. This will be worth its weight in gold on my co2 laser cutter, If i wuld like to connect 4 flow sensor to raspberry pi what changes can be made to program.

Sending notification took up to 10 seconds: connection to WiFi, sending notification, getting alarm message to your phone. After few seconds you should see empty command line.
It works.
2.Use "Send notification with subject" message. Select Setup|Hardware to add hardware. Do not be afraid, it is not so difficult. I will say they don't hold up well in freezers lol. But it doesn't mean that everything is lost :), just try second time, and you will succeed (again, from my experience). 2. Im using your script for my flow meter, but I cant find the pulse frequence.> flow = (count / 7.5) # Pulse frequency (Hz) = 7.5Q, Q is flow rate in L/min. Or is there a way I can test this?

Your ESP now is connected to your WiFi network and ready. Find where esptool is installed (normally somewhere like C:\Program Files (x86)\Python36-32\Scripts. This works for me on Windows machine perfectly. I have a novice understanding of Arduino but MicroPython is new to me.