Have a length of yarn about 100 times the width of your button. To learn more about the history of Dorset buttons and make your own, read Pat Olskis Dorset Buttons to Make, in the March/April 2018 issue of PieceWork, our 25th-Anniversary issue. dorset To make a beaded dorset button, make your button according to the above tutorial. Later, in the mid-1700s, Abrahams grandson Peter Case invented a nonrusting metal alloy that was used as a foundation for wire button rings. Thanks to all authors for creating a page that has been read 41,548 times. In my example demonstrated below in both my video and photo tutorials, I am using three different yarn colors to best show offthe three different steps: Ring Wrap, Spider Web, and Backstitch Weaving. Thread the tail onto a yarn needle. Needle through wraps Blanket stitch Pull off needle. Removable fabric marker that contrasts with your thread color. Laying. Tie thread round needle Wrap needle 20 times. I make my second stitch across my first, so they look like a cross. Holdthe tails out of the way. Tie the thread to the ring with a single knot, leaving a 1-inch tail. Center your frame on your chosen registration guide. Pat Olski is a knit, crochet, and needlework designer who loves to teach, stitch, and write. Dorset buttons are thread covered buttons created with embroidery stitches. 2. Use the tail to sew the button on through the middle. dorset button tree instructions experimental blossom hanging But I do have a better idea of how to do this now, i.e. This will give a nice loopy edge to the top of the shawl. Approximately 2.5m of firm thread (8 weight cotton perle is perfect), large eyed sewing needle, knitting needle or similar to wrap round. Wrap the thread round the needle 20 times, over the same place each time, covering the tail. So many great ideas for using Dorset buttons! Hope that makes sense oh the limitations of words! NB -the button is slightly wonky in this photo. Your purchases via these links may benefit Create Whimsy. Now, Dorset buttons are a popular button craft that you can make using a plastic or metal ring, some thread, and a needle. b. At the time, buttons were a status symbol and thousands of people made good livings producing buttons in the cottage industry. All you do is thread the beads on as you make the spokes, but it can be tricky. Make a shank Blanket stitch the shank. But what kind? Pat Olski Tapestry needle in a size compatible with your thread choice. Please scroll down to find the tutorial you want. Then bring the needle back up through the stitches and wiggle threads again to ensure the spokes are definitely centred and then do another stitch to secure spokes and to make sure they stay centred. The techniques that were used by Abraham Case and his sons and grandsons are every bit as artistic and useful today. If youre using just a regular ring as your base, go ahead and hold the short yarn tail down with your finger. There is also a dedicated Facebook page for a wider audience at https://www.facebook.com/groups/AIYSOTemperatureBlanketGroup/.  Do it before you think 'I'll just do one more stitch', as it's normally this stitch that tangles up!
This article was co-authored by wikiHow Staff. If youd like even more great knitting ideas, please make sure you join my mailing list. And there you go! Feel free to use any sized rings and yarn for your creative project. I used size 22. Did you know that a Thirty-Year-War soldier developed a method for making a thread-covered button? Twist the stitches so the ridge is facing inwards. Backstitch Weaving Begin stitching around the ring with blanket stitch, catching the thread tail inside the stitch. North Country Quilts (thats not the same as Welsh Quilts), Traditional Crafts Map of the British Isles. *Repeat from * to * until all the stitches have been cast off. Tying. d.Working anticlockwise, bring needle back up through to the left of the next spoke (i.e 11 oclock). Although the first button was the conical high-top, which was used primarily for mens waistcoats, the Dorset Cartwheel, which is formed over a ring foundation, is the most recognizable. If you find you are running out of thread simply thread the tail of yarn neatly through the back of the button and leave a long tail. Thread the needle through the back of the button either side of the hole. (It helps me if I think about the way I learned to draw a star when I was 5 - up, down, move around.). It's a lot of thread to handle at first, but you want to have enough to finish your button in one go. 2. You can find these rings in craft stores. You can hardly see the first few stitches but it becomes clearer as you go on. I cant seem to toggle from this tutorial to the next :-\. Casting, Slicking, Laying and Rounding. Also, remember that if you are an active subscriber to PieceWork magazine, you have unlimited access to previous issues, including March/April 2018. The tails can be woven into the back of the button at the end. Calls for Submissions and Editorial Calendar, DMC Pearl Cotton, 100% cotton thread, size 8, 95 yards (86.9 m)/10 gram (0.4 oz) ball, 1 ball of Ecru, John James Needles, tapestry size 22 (for the rounding step) and chenille size 16 (to anchor the thread when finished), Address: 1300 Riverside Ave, Ste 206, Fort Collins, CO, 80524. Is there a glaring error? Hi Kay I havent done a tutorial for the beaded on, maybe I should!
Do it before you think 'I'll just do one more stitch', as it's normally this stitch that tangles up!
This article was co-authored by wikiHow Staff. If youd like even more great knitting ideas, please make sure you join my mailing list. And there you go! Feel free to use any sized rings and yarn for your creative project. I used size 22. Did you know that a Thirty-Year-War soldier developed a method for making a thread-covered button? Twist the stitches so the ridge is facing inwards. Backstitch Weaving Begin stitching around the ring with blanket stitch, catching the thread tail inside the stitch. North Country Quilts (thats not the same as Welsh Quilts), Traditional Crafts Map of the British Isles. *Repeat from * to * until all the stitches have been cast off. Tying. d.Working anticlockwise, bring needle back up through to the left of the next spoke (i.e 11 oclock). Although the first button was the conical high-top, which was used primarily for mens waistcoats, the Dorset Cartwheel, which is formed over a ring foundation, is the most recognizable. If you find you are running out of thread simply thread the tail of yarn neatly through the back of the button and leave a long tail. Thread the needle through the back of the button either side of the hole. (It helps me if I think about the way I learned to draw a star when I was 5 - up, down, move around.). It's a lot of thread to handle at first, but you want to have enough to finish your button in one go. 2. You can find these rings in craft stores. You can hardly see the first few stitches but it becomes clearer as you go on. I cant seem to toggle from this tutorial to the next :-\. Casting, Slicking, Laying and Rounding. Also, remember that if you are an active subscriber to PieceWork magazine, you have unlimited access to previous issues, including March/April 2018. The tails can be woven into the back of the button at the end. Calls for Submissions and Editorial Calendar, DMC Pearl Cotton, 100% cotton thread, size 8, 95 yards (86.9 m)/10 gram (0.4 oz) ball, 1 ball of Ecru, John James Needles, tapestry size 22 (for the rounding step) and chenille size 16 (to anchor the thread when finished), Address: 1300 Riverside Ave, Ste 206, Fort Collins, CO, 80524. Is there a glaring error? Hi Kay I havent done a tutorial for the beaded on, maybe I should!  Starting in the centre, use back stitch* to loop around each spoke in turn.
  where you can share your project and get ideas. These circular back stitches are sometimes called spider stitch. Use different size needles or widths of dowel to vary the size of the button. Something old is new again and super cute!
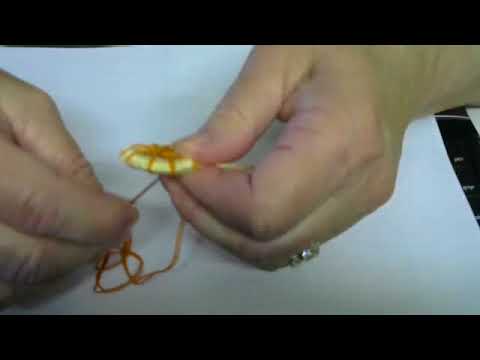
  Finish with a small cross stitch in the middle or fill slightly as if you are making a cross wheel. Bring the thread to the mark next to the bottom wrap and wrap snugly from back to front.. You can draw a template or download our templates to use they help a lot! Completed button Finishing off. Pass it back down clockwise over the spoke. dorset button peacock experimental instructions hanging beaded brooch jewellery kit beakerbutton Working anticlockwise around the button. This look is more subtle with values that are more aligned. Join the new thread in the same way and keep stitching. Many thanks for your help. Gently nudge the spokes with the needle, so they all cross over each other at the centre. I used 4mm needles for both the shawls in the photos. Pull the whole lot carefully off the needle.
  Stitch round the entire bundle in blanket stitch. The Dorset button originated in the 18th century in Dorset, England. Your email address will not be published. buttons dorset button crafts diy thread crochet string I chose a pink marker because it is visible on my blue thread. Once youve completely covered your ring, thread your yarn through the knots a couple times to secure it, then cut it off. This post may contain links to Amazon or other partners. These buttons became well known in the county of Dorset, England, in the UK. Fill in the whole wheel or stop whenever it tickles your fancy. e. Repeat stages b-d over and over again! [1] Lie it flat along the ring and blanket stitch over top of it. passementerie naaldkant techniques instrustion genht knopf bommel brosche weihnachtsschmuck travail knutselideen knoopwerkjes zijden knop anstecker handarbeit weben quasten akka glands
  There are four stages to making a Dorset Button on a ring. If you find you are running out of thread simply thread the tail of yarn neatly through the back of the button and leave a long tail. If it feels a little stiff then try again with larger needles. Stitch the buttons directly onto a garment, or add a small ring or thread shank to the buttons back. Blanket Stitch This is the last chance to wiggle them and its really easy to forget to do this bit. Start with your thread coming through ring from the back to the front at the top. Dont worry about the back as these spoke will lie off to one side until you put the two holding stitches in place at the end of the laying process. The spacing should be even. This forms one spoke. To make the button more central push the stitches closest to the edge into the middle with your finger, but leave the stitches furthest away. Continue with blanket stitch, making sure to capture the thread tail with each stitch. Pass it down one spoke clockwise. Tie the yarn round the ring in a single knot, leaving a tail of about 1-2cm. I use beads with a hole big enough to thread onto number 10 crochet cotton (this is thinner than peele cotton) or you could make the spokes with thinner cotton. I have been looking for an easy basic beginners tutorial, and this does the job perfectly. Keep stitches fairly tight and evenly pushed together to cover the ring.
  wikiHow's Content Management Team carefully monitors the work from our editorial staff to ensure that each article is backed by trusted research and meets our high quality standards.
  Read more about our affiliate linking policy, FREE Downloadable dorset button registration guide, Spotlight: Jules Bianchi, Needle Felt Artist, How to Determine your Target Audience for Digital Ads, How to Foundation Paper Piece using Freezer Paper, How to Sashiko Stitch: A Step-by-Step Guide, 7 Ways to Transfer your Embroidery Design to Fabric, 10 Easy Embroidery Stitches to Embellish Your Projects, How to Make the Double Hourglass Quilt Pattern 2, How to Make the Double Hourglass Quilt Pattern 1. Work the backstitch to weave this third strand of yarn through your spider web spokes. Now you begin to fill in the center of your button with back stitches. Make a stitch into your first stitch to secure the thread when you reach the end of the round. Try changing colors when you have gotten halfway through weaving around the spokes. Make two stitches in the centre of the wheel to hold the spokes in place, being careful to catch all the threads from the back and pull them into the middle. This cast off is done using a long tail of yarn and looks very similar to long tail cast on. 1. Please let me know and give me a pat on the back if its useful!!
  Make a shank for the button. A purse, jacket, sweater, pillow the possibilities are endless. Do not cut the thread after you finish wrapping the ring. Leave the yarn tail for sewing onto a garment. Have a length of firm thread approximately 2.5m long. If you want to be more accurate work a square in one of your chosen yarns using your chosen stitch, measure across 10cm and count the stitches.
 a. I'd recommend knitting the first few rows and seeing if you like the fabric you produce. The choice of stitch is yours, and you can vary the stitch or stick to one stitch as you like. By using our site, you agree to our. Continue back stitching rounds in this way until the entire button is filled. With it, create a Slip Knot from the center of your piece of yarn. Unfortunately, all this ended abruptly in 1851 when someone invented a button making machine. Thank you! You will be able to download the file if you have adobe. Turn all the stitches so that they face inwards, leaving a smooth edge to the button. Top tip there is no need to pull all the thread to the front of the button and then pull it all back to the back. Repeat this as many times as you like to incorporate beads into your Dorset button design. Studio 11, Fairground Craft and Design Centre, Weyhill, Hampshire, SP11 0QN /, Copyright 2015-2022 Beaker Button All rights reserved. If you need to change thread during this stage. You need it this long to cover the whole of the ring and create the spokes of the wheel without having to cast on again. Tie the thread round a knitting needle in a single knot, leaving a tail of about 1cm. It seems right at home on this purple. {"smallUrl":"https:\/\/www.wikihow.com\/images\/thumb\/f\/f2\/Make-Dorset-Buttons-Step-1.jpg\/v4-460px-Make-Dorset-Buttons-Step-1.jpg","bigUrl":"\/images\/thumb\/f\/f2\/Make-Dorset-Buttons-Step-1.jpg\/aid9244880-v4-728px-Make-Dorset-Buttons-Step-1.jpg","smallWidth":460,"smallHeight":306,"bigWidth":728,"bigHeight":485,"licensing":"
License: Creative Commons<\/a> License: Creative Commons<\/a> License: Creative Commons<\/a> License: Creative Commons<\/a> License: Creative Commons<\/a> License: Creative Commons<\/a> License: Creative Commons<\/a> License: Creative Commons<\/a> License: Creative Commons<\/a>
\n<\/p>
\n<\/p><\/div>"}, {"smallUrl":"https:\/\/www.wikihow.com\/images\/thumb\/8\/82\/Make-Dorset-Buttons-Step-2.jpg\/v4-460px-Make-Dorset-Buttons-Step-2.jpg","bigUrl":"\/images\/thumb\/8\/82\/Make-Dorset-Buttons-Step-2.jpg\/aid9244880-v4-728px-Make-Dorset-Buttons-Step-2.jpg","smallWidth":460,"smallHeight":306,"bigWidth":728,"bigHeight":485,"licensing":"
\n<\/p>
\n<\/p><\/div>"}, {"smallUrl":"https:\/\/www.wikihow.com\/images\/thumb\/8\/8e\/Make-Dorset-Buttons-Step-3.jpg\/v4-460px-Make-Dorset-Buttons-Step-3.jpg","bigUrl":"\/images\/thumb\/8\/8e\/Make-Dorset-Buttons-Step-3.jpg\/aid9244880-v4-728px-Make-Dorset-Buttons-Step-3.jpg","smallWidth":460,"smallHeight":306,"bigWidth":728,"bigHeight":485,"licensing":"
\n<\/p>
\n<\/p><\/div>"}, {"smallUrl":"https:\/\/www.wikihow.com\/images\/thumb\/2\/24\/Make-Dorset-Buttons-Step-4.jpg\/v4-460px-Make-Dorset-Buttons-Step-4.jpg","bigUrl":"\/images\/thumb\/2\/24\/Make-Dorset-Buttons-Step-4.jpg\/aid9244880-v4-728px-Make-Dorset-Buttons-Step-4.jpg","smallWidth":460,"smallHeight":306,"bigWidth":728,"bigHeight":485,"licensing":"
\n<\/p>
\n<\/p><\/div>"}, {"smallUrl":"https:\/\/www.wikihow.com\/images\/thumb\/0\/05\/Make-Dorset-Buttons-Step-5.jpg\/v4-460px-Make-Dorset-Buttons-Step-5.jpg","bigUrl":"\/images\/thumb\/0\/05\/Make-Dorset-Buttons-Step-5.jpg\/aid9244880-v4-728px-Make-Dorset-Buttons-Step-5.jpg","smallWidth":460,"smallHeight":306,"bigWidth":728,"bigHeight":485,"licensing":"
\n<\/p>
\n<\/p><\/div>"}, {"smallUrl":"https:\/\/www.wikihow.com\/images\/thumb\/3\/33\/Make-Dorset-Buttons-Step-6.jpg\/v4-460px-Make-Dorset-Buttons-Step-6.jpg","bigUrl":"\/images\/thumb\/3\/33\/Make-Dorset-Buttons-Step-6.jpg\/aid9244880-v4-728px-Make-Dorset-Buttons-Step-6.jpg","smallWidth":460,"smallHeight":306,"bigWidth":728,"bigHeight":485,"licensing":"
\n<\/p>
\n<\/p><\/div>"}, {"smallUrl":"https:\/\/www.wikihow.com\/images\/thumb\/6\/67\/Make-Dorset-Buttons-Step-7.jpg\/v4-460px-Make-Dorset-Buttons-Step-7.jpg","bigUrl":"\/images\/thumb\/6\/67\/Make-Dorset-Buttons-Step-7.jpg\/aid9244880-v4-728px-Make-Dorset-Buttons-Step-7.jpg","smallWidth":460,"smallHeight":306,"bigWidth":728,"bigHeight":485,"licensing":"
\n<\/p>
\n<\/p><\/div>"}, {"smallUrl":"https:\/\/www.wikihow.com\/images\/thumb\/8\/84\/Make-Dorset-Buttons-Step-8.jpg\/v4-460px-Make-Dorset-Buttons-Step-8.jpg","bigUrl":"\/images\/thumb\/8\/84\/Make-Dorset-Buttons-Step-8.jpg\/aid9244880-v4-728px-Make-Dorset-Buttons-Step-8.jpg","smallWidth":460,"smallHeight":306,"bigWidth":728,"bigHeight":485,"licensing":"
\n<\/p>
\n<\/p><\/div>"}, {"smallUrl":"https:\/\/www.wikihow.com\/images\/thumb\/6\/65\/Make-Dorset-Buttons-Step-9.jpg\/v4-460px-Make-Dorset-Buttons-Step-9.jpg","bigUrl":"\/images\/thumb\/6\/65\/Make-Dorset-Buttons-Step-9.jpg\/aid9244880-v4-728px-Make-Dorset-Buttons-Step-9.jpg","smallWidth":460,"smallHeight":306,"bigWidth":728,"bigHeight":484,"licensing":"
\n<\/p>
\n<\/p><\/div>"}, {"smallUrl":"https:\/\/www.wikihow.com\/images\/thumb\/2\/2e\/Make-Dorset-Buttons-Step-10.jpg\/v4-460px-Make-Dorset-Buttons-Step-10.jpg","bigUrl":"\/images\/thumb\/2\/2e\/Make-Dorset-Buttons-Step-10.jpg\/aid9244880-v4-728px-Make-Dorset-Buttons-Step-10.jpg","smallWidth":460,"smallHeight":306,"bigWidth":728,"bigHeight":485,"licensing":"